Hyundai Santa Fe (TM): Body (Interior and Exterior) / Interior Trim
Components and components location
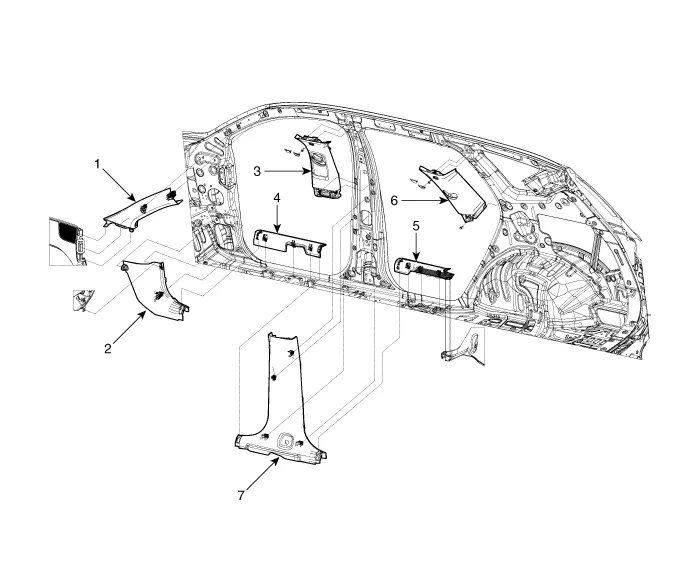
1. Front pillar
trim
2. Cowl side trim
3. Center pillar upper trim
4. Front door scuff trim
|
5. Rear door
scuff trim
6. Rear pillar trim
7. Center pillar lower trim
|
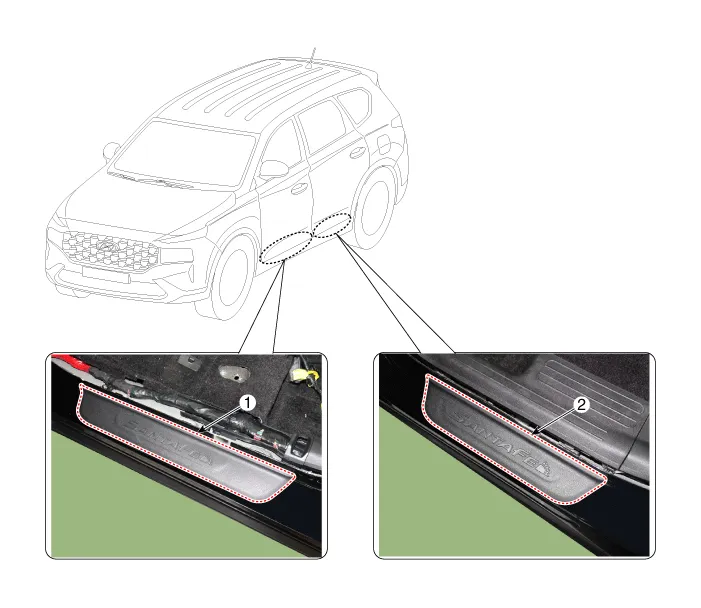
Door Scuff Trim. Components and components location
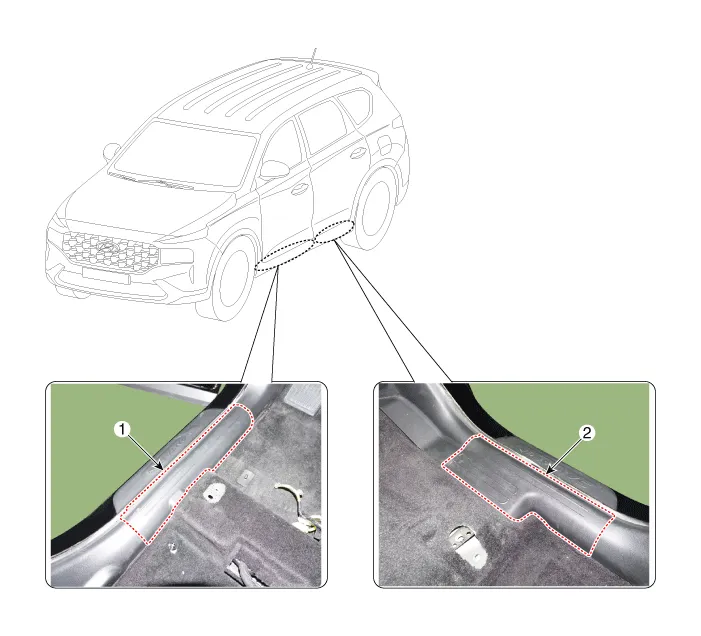
1. Front Door
Scuff Trim
|
2. Rear Door
Scuff Trim
|
Door Scuff Trim. Repair procedures
| •
|
Put on gloves to prevent hand injuries.
|
|
| •
|
When removing with a flat-tip screwdriver or remover, wrap protective
tape around the tools to prevent damage to components.
|
| •
|
When removing the interior trim pieces, use a plastic panel
removal tool not to damage the surface.
|
| •
|
Take care not to bend or scratch the trim and panels.
|
|
[Front]
|
1. |
Remove the front door body side weatherstrip.
|
|
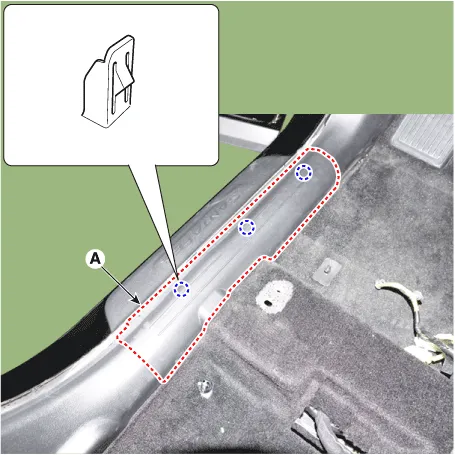
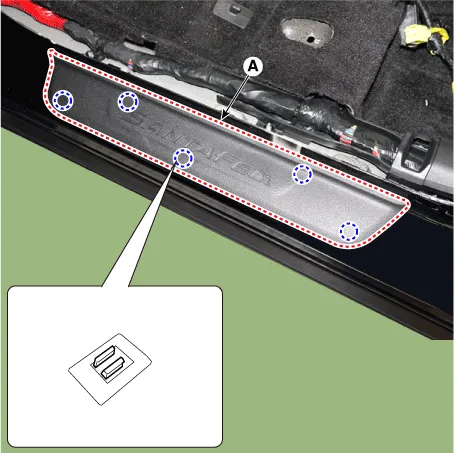
2. |
Using a screwdriver or remover and remove the front door scuff trim
(A).
|
|
3. |
To install, reverse removal procedure.
|
• |
Replace any damaged clips (or pin-type retainers).
|
|
|
[Rear]
|
1. |
Remove the rear door body side weatherstrip.
|
|
2. |
Remove the rear seat cusion assembly.
(Refer to Rear seat -"Rear Seat Assembly")
|
|
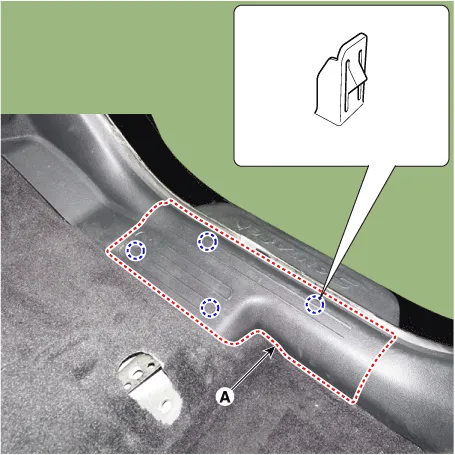
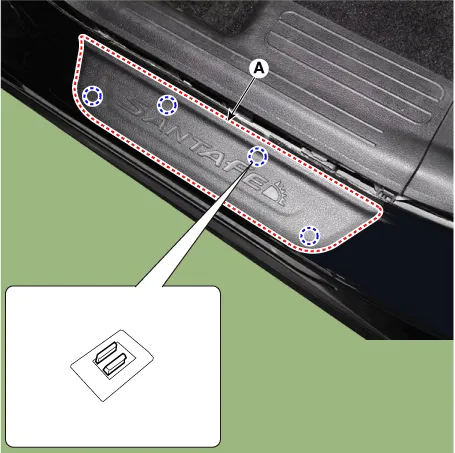
3. |
Using a screwdriver and remove the rear door scuff trim (A).
|
|
4. |
To install, reverse removal procedure.
|
• |
Replace any damaged clips (or pin-type retainers).
|
|
|
Door Step Trim. Components and components location
1. Front Door
Step Trim
|
2. Rear Door
Step Trim
|
Door Step Trim. Repair procedures
| •
|
Put on gloves to protect your hands.
|
|
| •
|
When prying with a flat-tip screwdriver, wrap it with protective
tape, and apply protective tape around the related parts, to
prevent damage.
|
| •
|
Use a plastic panel removal tool to remove interior trim pieces
to protect from marring the surface.
|
| •
|
Take care not to bend or scratch the trim and panels.
|
|
|
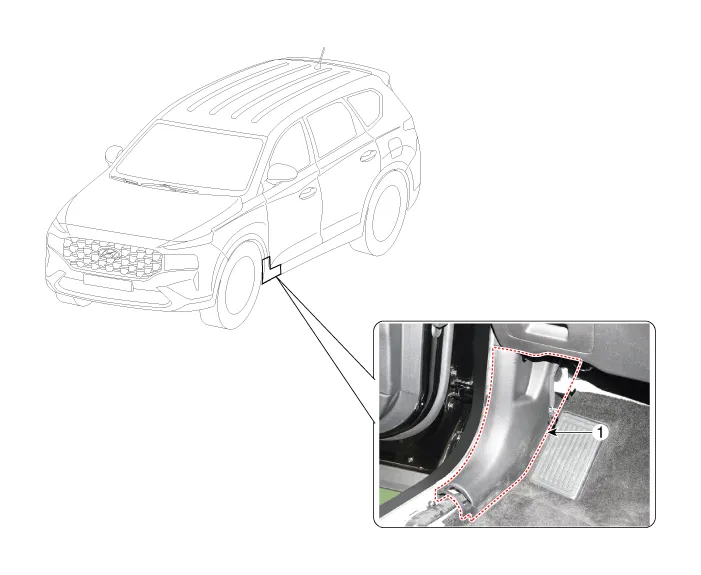
1. |
Using a screwdriver or remover and remove the front door step trim (A).
[Front]
[Rear]
|
|
2. |
To install, reverse removal procedure.
|
• |
Replace any damaged clips.
|
|
|
Cowl Side Trim. Components and components location
Cowl Side Trim. Repair procedures
| •
|
Put on gloves to prevent hand injuries.
|
|
| •
|
When removing with a flat-tip screwdriver or remover, wrap protective
tape around the tools to prevent damage to components.
|
| •
|
When removing the interior trim pieces, use a plastic panel
removal tool not to damage the surface.
|
| •
|
Take care not to bend or scratch the trim and panels.
|
|
|
1. |
Remove the front door scuff trim.
(Refer to Interior Trim - "Door Scuff Trim")
|
|
2. |
Remove the hood latch release handle.
(Refer to Hood - "Hood Latch Release Handle")
|
|
3. |
Carefully remove the front door body side weatherstrip.
|
|
4. |
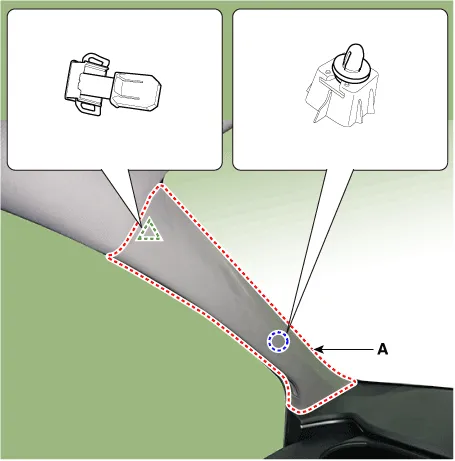
Using a screwdriver or remover, remove the cowl side trim (A).
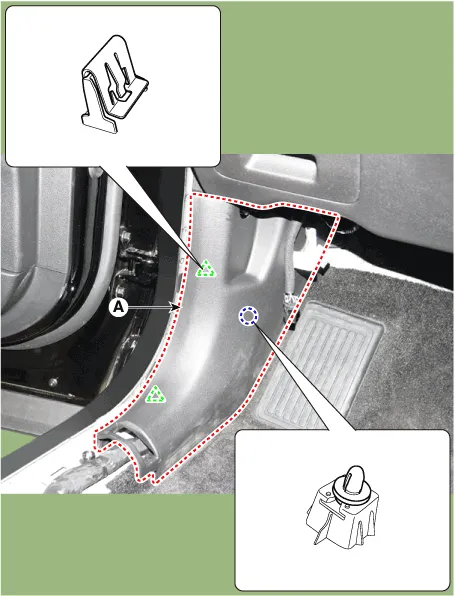
|
|
5. |
To install, reverse removal procedure.
|
• |
Replace any damaged clips (or pin-type retainers).
|
|
|
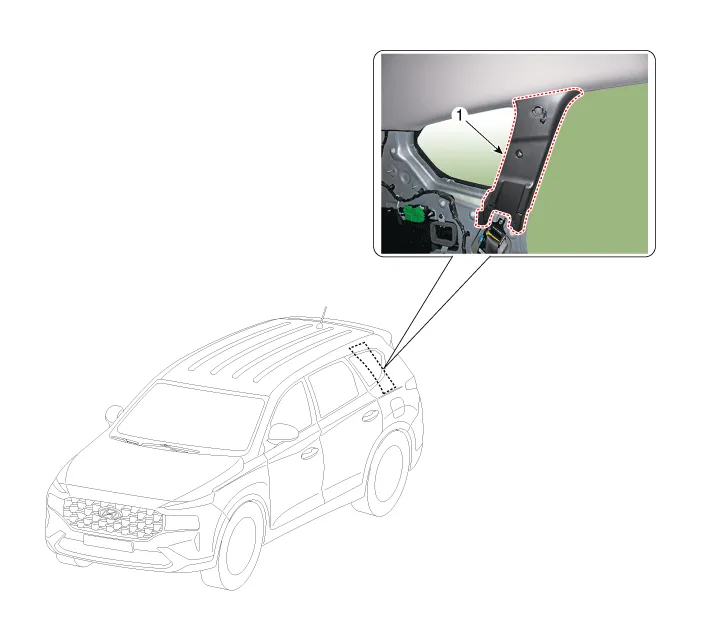
Front Pillar Trim. Components and components location
Front Pillar Trim. Repair procedures
| •
|
Put on gloves to prevent hand injuries.
|
|
| •
|
When removing with a flat-tip screwdriver or remover, wrap protective
tape around the tools to prevent damage to components.
|
| •
|
When removing the interior trim pieces, use a plastic panel
removal tool not to damage the surface.
|
| •
|
Take care not to bend or scratch the trim and panels.
|
|
|
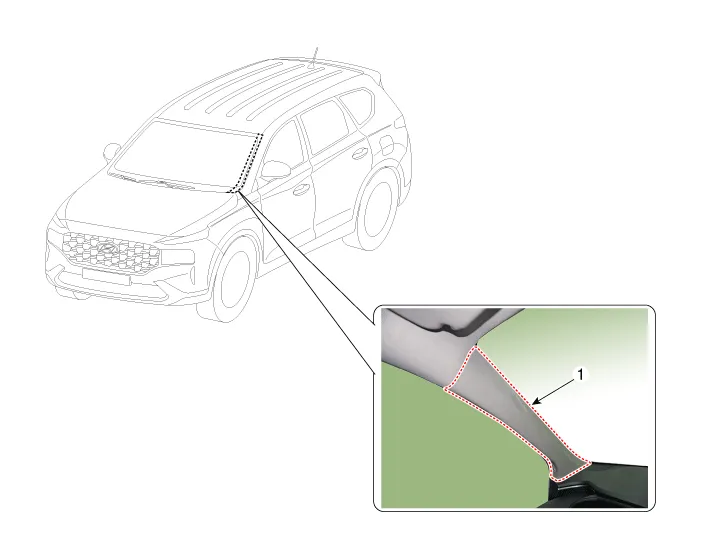
1. |
Remove the front pillar trim.
|
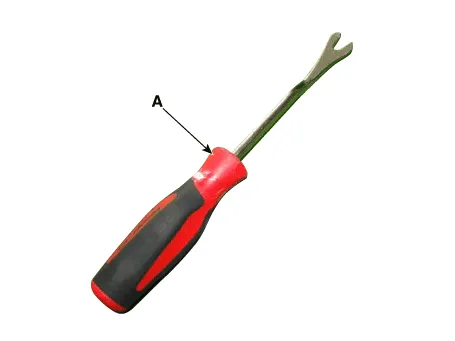
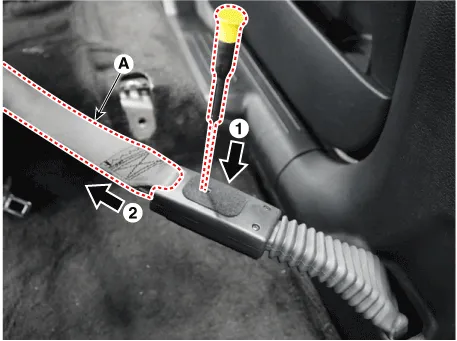
(1) |
To remove the front pillar trim, the fastener remover (A) below
must be used.
|
|
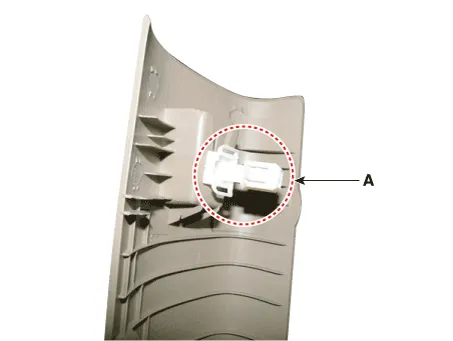
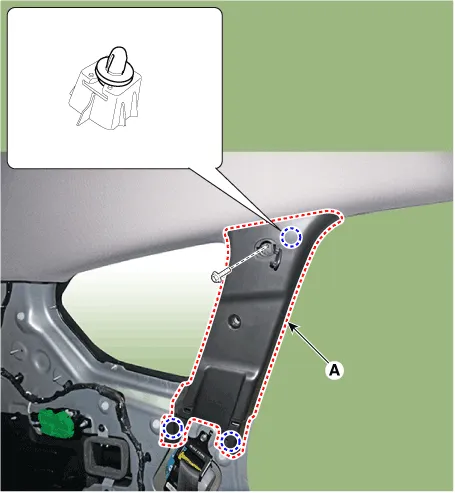
(2) |
After slightly lifting up the front pillar trim and putting
the tool in, remove the mounting clip (A) by pulling it.
|
• |
Once the front pillar trim is removed, be sure
to replace the clips with new ones.
|
|
|
|
(3) |
Remove the front pillar trim (A).
|
|
|
2. |
To install, reverse removal procedure.
|
• |
Replace any damaged clips (or pin-type retainers).
|
|
|
Center Pillar Trim. Components and components location
1. Center Pillar
Lower Trim
|
2. Center Pillar
Upper Trim
|
Center Pillar Trim. Repair procedures
[Center pillar lower trim]
| •
|
Put on gloves to prevent hand injuries.
|
|
| •
|
When removing with a flat-tip screwdriver or remover, wrap protective
tape around the tools to prevent damage to components.
|
| •
|
When removing the interior trim pieces, use a plastic panel
removal tool not to damage the surface.
|
| •
|
Take care not to bend or scratch the trim and panels.
|
|
|
1. |
Remove the front door scuff trim.
(Refer to Interior Trim -"Door Scuff Trim")
|
|
2. |
Remove the rear door scuff trim.
(Refer to Interior Trim -"Rear Scuff Trim")
|
|
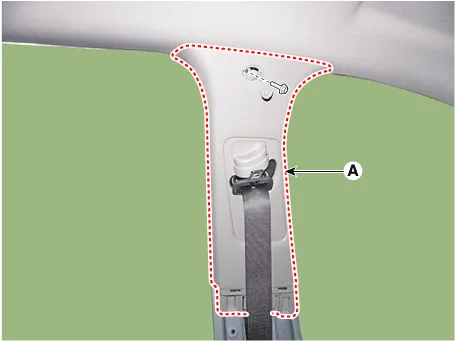
3. |
Remove the front seat belt anchor (A).
|
• |
When installing the connector, be sure to insert it
to the anchor pretensioner until "Click" sound is heard
and then check it for secure installation by pulling
it.
|
|
|
|
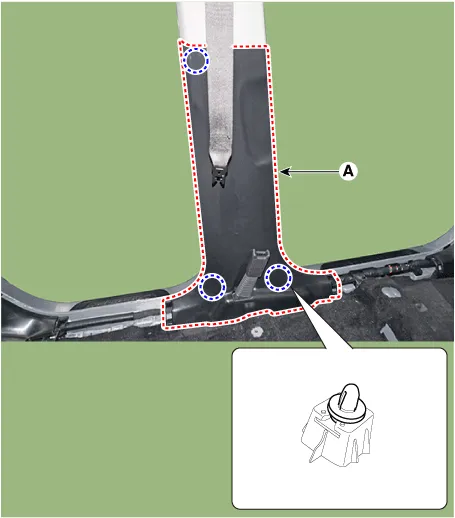
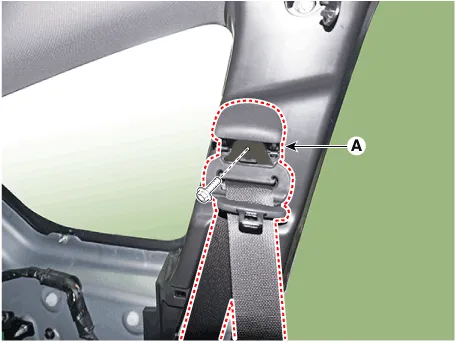
4. |
Using a remover and remove the center pillar lower trim (A)
|
|
5. |
To install, reverse removal procedure.
|
• |
Replace any damaged clips (or pin-type retainers).
|
|
|
[Center pillar upper trim]
| •
|
Put on gloves to prevent hand injuries.
|
|
| •
|
When removing with a flat-tip screwdriver or remover, wrap protective
tape around the tools to prevent damage to components.
|
| •
|
When removing the interior trim pieces, use a plastic panel
removal tool not to damage the surface.
|
| •
|
Take care not to bend or scratch the trim and panels.
|
|
|
1. |
Remove the center pillar lower trim.
(Refer to Interior Trim -"Center Pillar Lower Trim")
|
|
2. |
Loosen the mounting bolt and remove the center pillar upper trim (A).
|
|
3. |
To install, reverse removal procedure.
|
• |
Replace any damaged clips (or pin-type retainers).
|
|
|
Rear Pillar Trim. Components and components location
Rear Pillar Trim. Repair procedures
| •
|
Put on gloves to prevent hand injuries.
|
|
| •
|
When removing with a flat-tip screwdriver or remover, wrap protective
tape around the tools to prevent damage to components.
|
| •
|
When removing the interior trim pieces, use a plastic panel
removal tool not to damage the surface.
|
| •
|
Take care not to bend or scratch the trim and panels.
|
| •
|
Once the rear pillar trim is removed, be sure to replace the
clips with new ones.
|
|
|
1. |
Remove the luggage side trim.
(Refer to Interior Trim - "Luggage Side Trim")
|
|
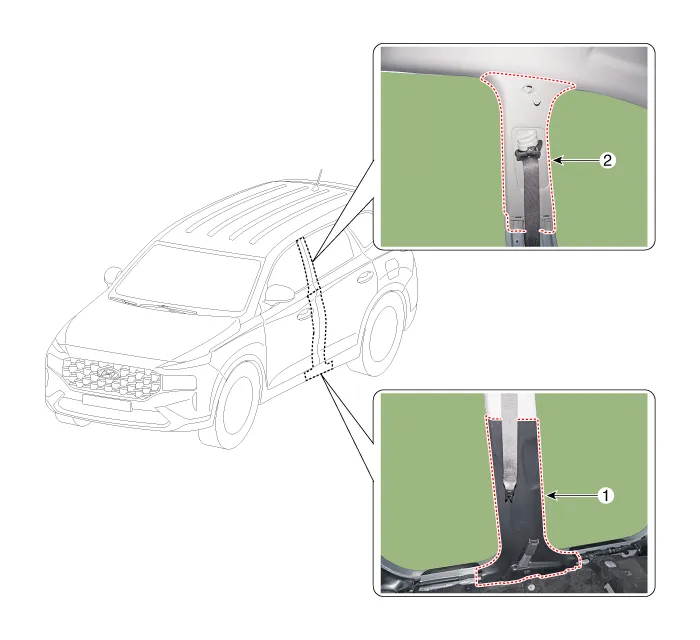
2. |
After loosening the mounting bolt and remove the second row seat belt
upper anchor (A).
|
|
3. |
After loosening the mounting bolts, remove the rear pillar trim (A).
|
|
4. |
To install, reverse removal procedure.
|
• |
Replace any damaged clips (or pin-type retainers).
|
|
• |
Once the front pillar trim is removed, be sure to replace
the clip (B) with new ones.
|
|
|
Components and components location
Components
[General Type]
1. Sunvisor
2. Roof trim
Components
[Panorama Sunroof Type]
1.
Components and components location
Components
[5 seat vehicle]
1. Luggage side
trim [LH]
2. Luggage side trim [RH]
3.
Other information:
Inspection
1.
Check the resistance of the ambient temperature sensor between terminals
1 and 2 whether it changes by changing the ambient temperature.
1. Ambient
Sensor (+)
2.
Desctiprion and operation
Description
ADAS_PRK is a unit that controls the functions required for ADAS parking. If
the ADAS_PRK is applied, the parking distance warning function is also controlled
by the ADAS_PRK.
System Function
Parking Collision-Avoidance Assist
(PCA)
PCA is a parking safety system


