Hyundai Santa Fe (TM): Body (Interior and Exterior) / Floor Carpet. Repair procedures
Repair procedures
| Replacement |
|

|

| 1. |
Remove the front seat assembly.
(Refer to Front Seat - "Front Seat Assembly")
|
| 2. |
Remove the rear seat cushion assembly.
(Refer to Rear Seat - "Rear Seat Assembly")
|
| 3. |
Remove the floor console assembly.
(Refer to Floor Console - "Floor Console Assembly")
|
| 4. |
Remove the cowl side trim.
(Refer to Interior Trim - "Cowl Side Trim")
|
| 5. |
Remove the center pillar lower trim.
(Refer to Interior Trim - "Center Pillar Trim")
|
| 6. |
Remove the accelerator pedal module.
(Refer to Fuel system-"accelerator pedal")
|
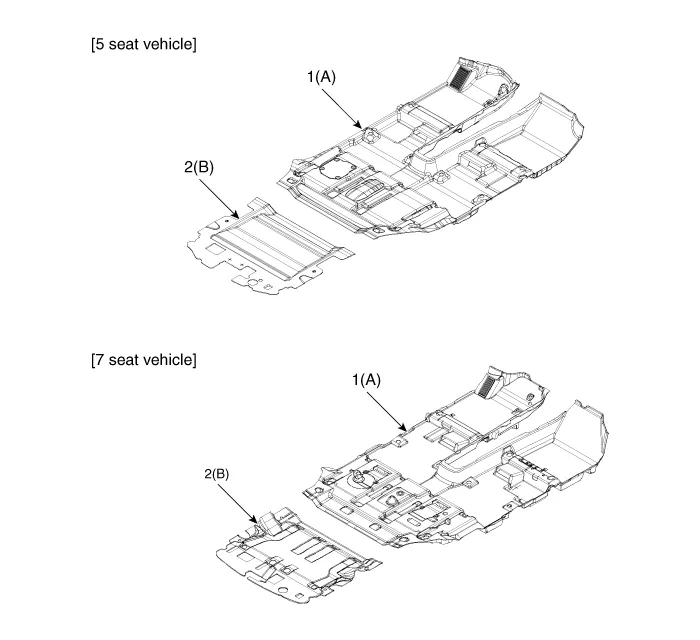
| 7. |
Remove the front floor carpet assembly (A) , and rear floor carpet assembly
(B).
|
| 8. |
To install, reverse removal procedure.
|

Components and components location Components 1. Quarter Fixed Glass Repair procedures Replacement [Removal] • Put on gloves to prevent hand injuries.
Front Bumper Beam Assembly. Components and components location Components Location 1. Front bumper beam assembly Front Bumper Beam Assembly.
Other information:
Hyundai Santa Fe (TM) 2019-2023 Service and Repair Manual: Fuel Filler Door
Components and components location Component Location 1. Fuel filler door release actuator Fuel Filler Door Release Actuator. Repair procedures Removal 1. Remove the left luggage side trim.
Hyundai Santa Fe (TM) 2019-2023 Service and Repair Manual: Windshield Wiper/Washer
Components and components location Component Location 1. Windshield wiper arm & blade 2. Wiper & washer switch 3. Windshield washer hose 4. Windshield wiper motor & linkage 5. Washer motor 6.
Categories
- Manuals Home
- Hyundai Santa Fe Owners Manual
- Hyundai Santa Fe Service Manual
- Blower
- Troubleshooting
- Lane Following Assist (LFA)
- New on site
- Most important about car
