Hyundai Santa Fe: Engine Control/Fuel System / Troubleshooting
Basic Troubleshooting Guide
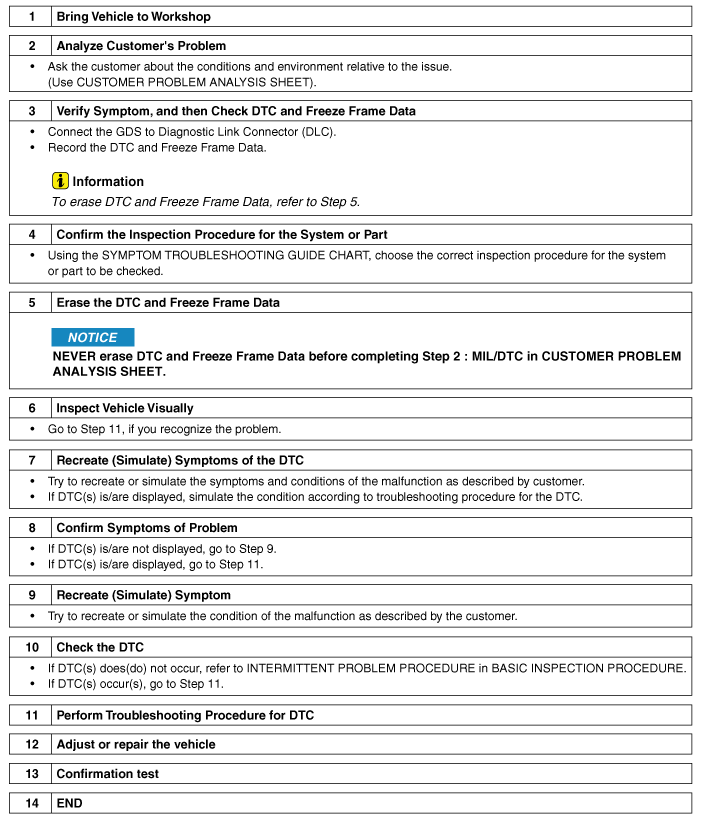
Customer Problem Analysis Sheet
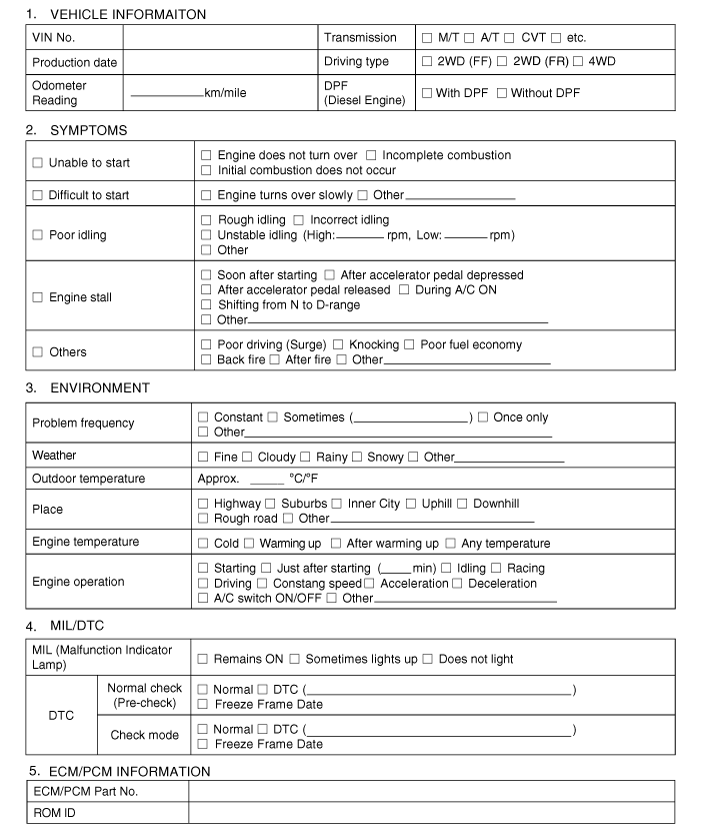
Basic Inspection Procedure
| Measuring Condition of Electronic Parts'
Resistance |
The measured resistance at high temperature after vehicle running may be high
or low. So all resistance must be measured at ambient temperature (20°C, 68°F),
unless stated otherwise.
| •
|
The measured resistance in except for ambient temperature (20°C,
68°F) is reference value.
|
|
| Intermittent Problem Inspection Procedure |
Sometimes the most difficult case in troubleshooting is when a problem symptom
occurs but does not occur again during testing. An example would be if a problem
appears only when the vehicle is cold but has not appeared when warm. In this
case, the technician should thoroughly make out a "Customer Problem Analysis
Sheet" and recreate (simulate) the environment and condition which occurred
when the vehicle was having the issue.
|
1. |
Clear Diagnostic Trouble Code (DTC).
|
|
2. |
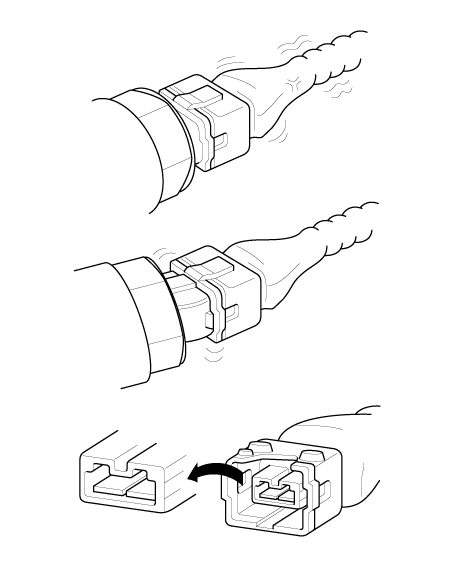
Inspect connector connection, and check terminal for poor connections,
loose wires, bent, broken or corroded pins, and then verify that the
connectors are always securely fastened.
|
|
3. |
Slightly shake the connector and wiring harness vertically and horizontally.
|
|
4. |
Repair or replace the component that has a problem.
|
|
5. |
Verify that the problem has disappeared with the road test.
|
● Simulating Vibration
| a. |
Sensors and Actuators
: Slightly vibrate sensors, actuators or relays with finger.
|
• |
Strong vibration may break sensors, actuators or relays
|
|
|
| b. |
Connectors and Harness
: Lightly shake the connector and wiring harness vertically and then
horizontally.
|
● Simulating Heat
| a. |
Heat components suspected of causing the malfunction with a hair dryer
or other heat source.
|
• |
DO NOT heat components to the point where they may be
damaged.
|
|
• |
DO NOT heat the ECM directly.
|
|
|
● Simulating Water Sprinkling
| a. |
Sprinkle water onto vehicle to simulate a rainy day or a high humidity
condition.
|
• |
DO NOT sprinkle water directly into the engine compartment
or electronic components.
|
|
|
● Simulating Electrical Load
| a. |
Turn on all electrical systems to simulate excessive electrical loads.
(Radios, fans, lights, rear window defogger, etc.)
|
Connector Inspection Procedure
|
1. |
Handling of Connector
| a. |
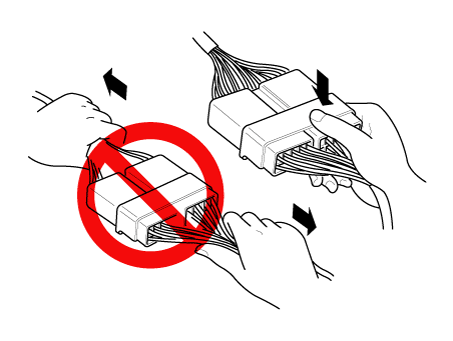
Never pull on the wiring harness when disconnecting connectors.
|
| b. |
When removing the connector with a lock, press or pull locking
lever.
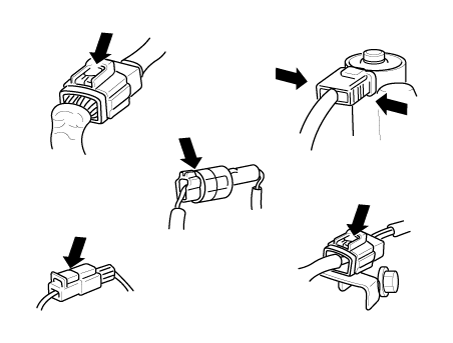
|
| c. |
Listen for a click when locking connectors. This sound indicates
that they are securely locked.
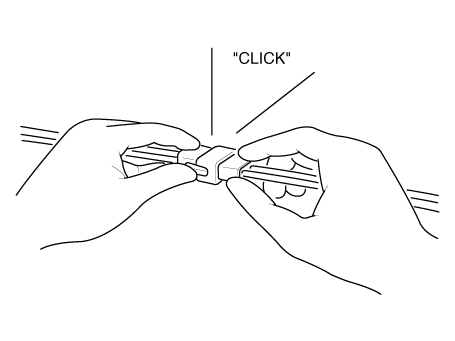
|
| d. |
When a tester is used to check for continuity, or to measure
voltage, always insert tester probe from wire harness side.
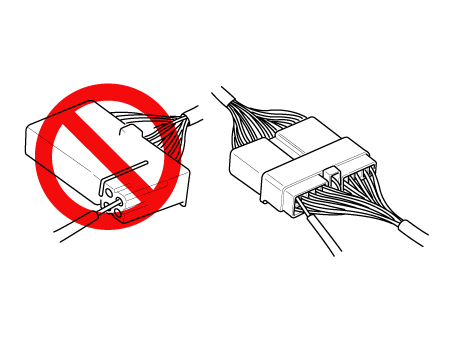
|
| e. |
Check waterproof connector terminals from the connector side.
Waterproof connectors cannot be accessed from harness side.
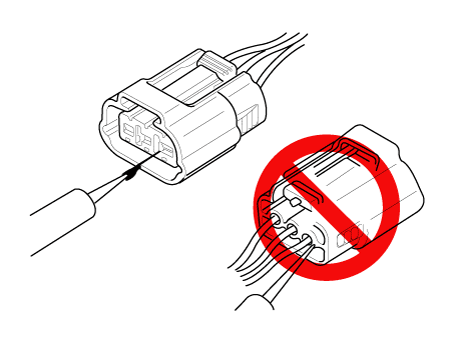
|
• |
Use a fine wire to prevent damage to the terminal.
|
|
• |
Do not damage the terminal when inserting the
tester lead.
|
|
|
|
|
2. |
Checking Point for Connector
| a. |
While the connector is connected:
Hold the connector, check connecting condition and locking efficiency.
|
| b. |
When the connector is disconnected:
Check missed terminal, crimped terminal or broken core wire
by slightly pulling the wire harness.
Visually check for rust, contamination, deformation and bend.
|
| c. |
Check terminal tightening conditioN :
Insert a spare male terminal into a female terminal, and then
check terminal tightening conditions.
|
| d. |
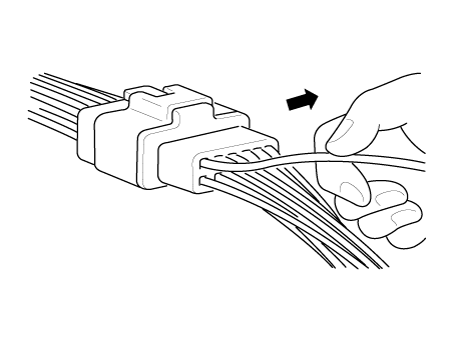
Pull lightly on individual wires to ensure that each wire is
secured in the terminal.
|
|
|
3. |
Repair Method of Connector Terminal
| a. |
Clean the contact points using air gun and/or shop rag.
|
• |
Never use sand paper when polishing the contact
points, otherwise the contact point may be damaged.
|
|
|
| b. |
In case of abnormal contact pressure, replace the female terminal.
|
|
Wire Harness Inspection Procedure
|
1. |
Before removing the wire harness, check the wire harness position and
crimping in order to restore it correctly.
|
|
2. |
Check whether the wire harness is twisted, pulled or loosened.
|
|
3. |
Check whether the temperature of the wire harness is abnormally high.
|
|
4. |
Check whether the wire harness is rotating, moving or vibrating against
the sharp edge of a part.
|
|
5. |
Check the connection between the wire harness and any installed part.
|
|
6. |
If the covering of wire harness is damaged; secure, repair or replace
the harness.
|
Electrical Circuit Inspection Procedure
|
1. |
Procedures for Open Circuit
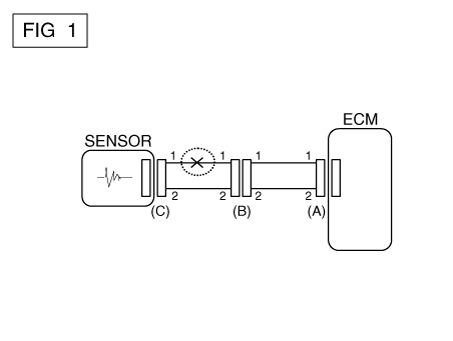
If an open circuit occurs (as seen in [FIG. 1]), it can be found by
performing Step 2 (Continuity Check Method) or Step 3 (Voltage Check
Method) as shown below.
|
|
2. |
Continuity Check Method
|
• |
When measuring for resistance, lightly shake the wire
harness above and below or from side to side.
|
|
|
Specification (Resistance)
1Ω or less → Normal Circuit
1MΩ or Higher → Open Circuit
|
| a. |
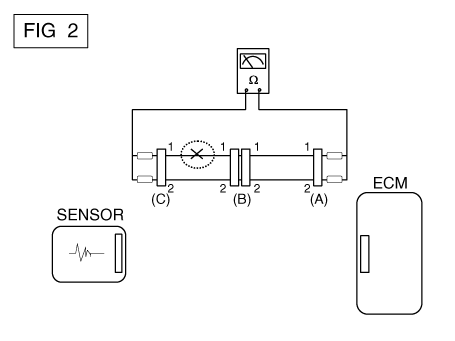
Disconnect connectors (A), (C) and measure resistance between
connector (A) and (C) as shown in [FIG. 2].
In [FIG.2.] the measured resistance of line 1 and 2 is higher
than 1MΩ and below 1Ω respectively. Specifically the open circuit
is line 1 (Line 2 is normal). To find exact break point, check
sub line of line 1 as described in next step.
|
| b. |
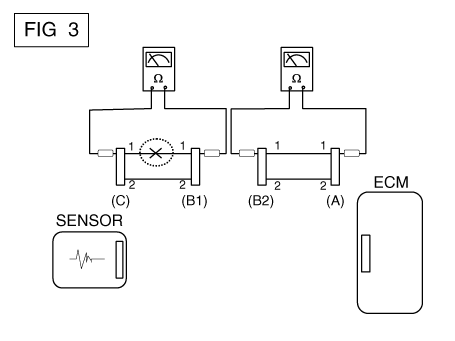
Disconnect connector (B), and measure for resistance between
connector (C) and (B1) and between (B2) and (A) as shown in
[FIG. 3].
In this case the measured resistance between connector (C) and
(B1) is higher than 1MΩ and the open circuit is between terminal
1 of connector (C) and terminal 1 of connector (B1).
|
|
|
3. |
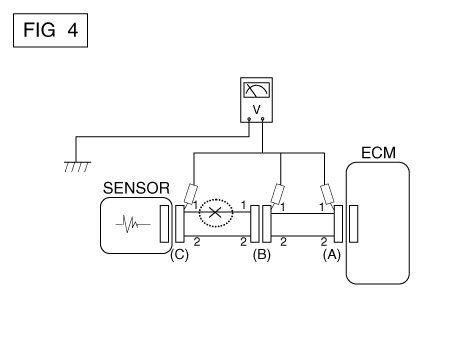
Voltage Check Method
| a. |
With each connector still connected, measure the voltage between
the chassis ground and terminal 1 of each connectors (A), (B)
and (C) as shown in [FIG. 4].
The measured voltage of each connector is 5V, 5V and 0V respectively.
So the open circuit is between connector (C) and (B).
|
|
|
1. |
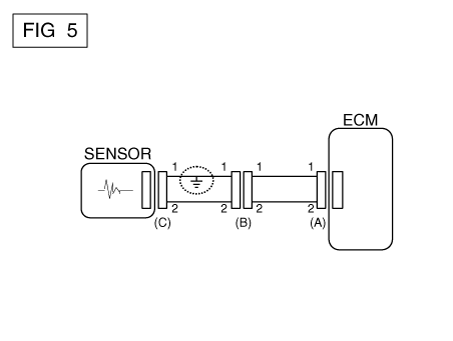
Test Method for Short to Ground Circuit
| •
|
Continuity Check with Chassis Ground
|
If short to ground circuit occurs as shown in [FIG. 5], the broken point
can be found by performing Step 2 (Continuity Check Method with Chassis
Ground) as shown below.
|
|
2. |
Continuity Check Method (with Chassis Ground)
|
• |
Lightly shake the wire harness above and below, or from
side to side when measuring the resistance.
|
|
|
Specification (Resistance)
1Ω or less → Short to Ground Circuit
1MΩ or Higher → Normal Circuit
|
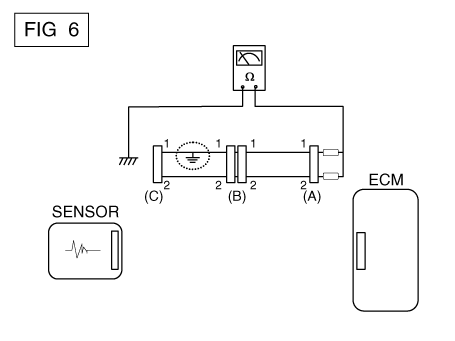
| a. |
Disconnect connectors (A), (C) and measure for resistance between
connector (A) and Chassis Ground as shown in [FIG. 6].
The measured resistance of line 1 and 2 in this example is below
1Ω and higher than 1MΩ respectively. Specifically the short
to ground circuit is line 1 (Line 2 is normal). To find exact
broken point, check the sub line of line 1 as described in the
following step.
|
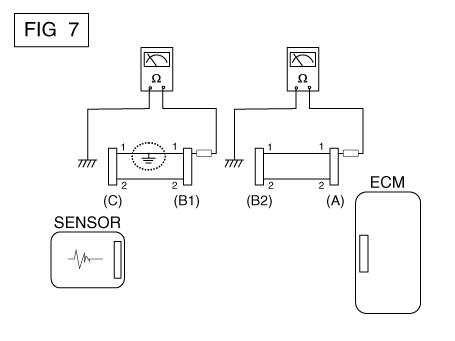
| b. |
Disconnect connector (B), and measure the resistance between
connector (A) and chassis ground, and between (B1) and chassis
ground as shown in [FIG. 7].
The measured resistance between connector (B1) and chassis ground
is 1Ω or less. The short to ground circuit is between terminal
1 of connector (C) and terminal 1 of connector (B1).
|
|
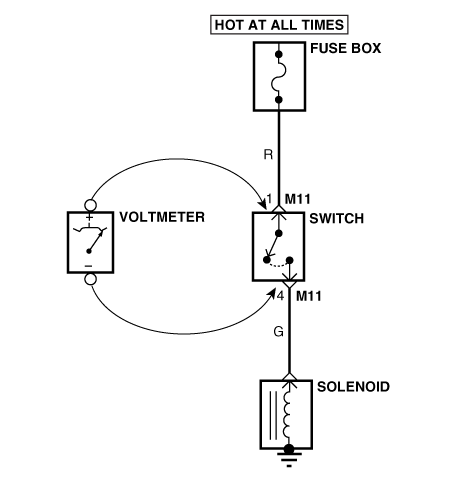
| ● Testing For Voltage Drop |
This test checks for voltage drop along a wire, or through a connection orswitch.
| A. |
Connect the positive lead of a voltmeter to the end of the wire (or
to the side of the connector or switch) closest to the battery.
|
| B. |
Connect the negative lead to the other end of the wire. (or the other
side of the connector or switch)
|
| D. |
The voltmeter will show the difference in voltage between the two points.
A difference, or drop of more than 0.1 volts (50mV in 5V circuits),
may indicate a problem. Check the circuit for loose or dirty connections.
|
Symptom Troubleshooting Guide Chart
Main symptom
|
Diagnostic procedure
|
Also check for
|
Unable to start
(Engine does not turn over)
|
| 1) |
Test the battery.
(Refer to Engine Electrical System - "Battery")
|
| 2) |
Test the starter.
(Refer to Engine Electrical System - "Starter")
|
| 3) |
Inhibitor switch (A/T) or clutch start switch (M/T)
|
|
|
Unable to start
(Incomplete combustion)
|
| 1) |
Test the battery.
(Refer to Engine Electrical System - "Battery")
|
| 2) |
Check the fuel pressure
(Refer to Fuel Delivery System - "Fuel Pressure Test")
|
| 3) |
Check the ignition circuit.
(Refer to Engine Electrical System - "Ignition System")
|
| 4) |
Troubleshooting the immobilizer system.
(Refer to Body Electrical System - "Immobilizer System")
(In case of immobilizer lamp flashing)
|
|
| •
|
Slipped or broken timing belt
|
|
Difficult to start
|
| 1) |
Test the battery.
(Refer to Engine Electrical System - "Battery")
|
| 2) |
Check the fuel pressure
(Refer to Fuel Delivery System - "Fuel Pressure Test")
|
| 3) |
Check the ECT sensor and circuit (Check DTC)
|
| 4) |
Check the ignition circuit.
(Refer to Engine Electrical System - "Ignition System")
|
|
|
Poor idling
(Rough, unstable or incorrect Idle)
|
| 1) |
Check the fuel pressure.
(Refer to Fuel Delivery System - "Fuel Pressure Test")
|
| 2) |
Check the Injector.
(Refer to Engine Control System - "Injector")
|
| 3) |
Check the long term fuel trim and short term fuel trim
(Refer to CUSTOMER DATASTREAM)
|
| 4) |
Check the idle speed control circuit (Check DTC)
|
| 5) |
Inspect and test the Throttle Body
|
| 6) |
Check the ECT sensor and circuit (Check DTC)
|
|
|
Engine stall
|
| 1) |
Test the battery.
(Refer to Engine Electrical System - "Battery")
|
| 2) |
Check the fuel pressure.
(Refer to Fuel Delivery System - "Fuel Pressure Test")
|
| 3) |
Check the idle speed control circuit (Check DTC)
|
| 4) |
Check the ignition circuit.
(Refer to Engine Electrical System - "Ignition System")
|
| 5) |
Check the CKPS Circuit (Check DTC)
|
|
|
Poor driving
(Surge)
|
| 1) |
Check the fuel pressure.
(Refer to Fuel Delivery System - "Fuel Pressure Test")
|
| 2) |
Inspect and test Throttle Body
|
| 3) |
Check the ignition circuit.
(Refer to Engine Electrical System - "Ignition System")
|
| 4) |
Check the ECT Sensor and Circuit (Check DTC)
|
| 5) |
Test the exhaust system for a possible restriction.
(Refer to Engine Mechanical System - "Exhaust Manifold")
|
| 6) |
Check the long term fuel trim and short term fuel trim.
(Refer to CUSTOMER DATASTREAM)
|
|
|
Knocking
|
| 1) |
Check the fuel pressure.
(Refer to Fuel Delivery System - "Fuel Pressure Test")
|
| 2) |
Inspect the engine coolant.
(Refer to Engine Mechanical System - "Radiator")
|
| 3) |
Inspect the radiator and the electric cooling fan.
(Refer to Engine Mechanical System - "Radiator")
|
| 4) |
Check the spark plugs.
(Refer to Engine Electrical System - "Ignition System")
|
|
|
Poor fuel economy
|
| 1) |
Check customer's driving habitsIs
· A/C on full time or the defroster mode on?
· Are tires at correct pressure?
· Is excessively heavy load being carried?
· Is acceleration too much, too often?
|
| 2) |
Check the fuel pressure.
(Refer to Fuel Delivery System - "Fuel Pressure Test")
|
| 3) |
Check the injector.
(Refer to Engine Control System - "Injector")
|
| 4) |
Test the exhaust system for a possible restriction
|
| 5) |
Check the ECT sensor and circuit
|
|
|
Hard to refuel
(Overflow during refueling)
|
| 1) |
Inspect the fuel filler hose/pipe
· Pinched, kinked or blocked?
· Filler hose is torn
|
| 2) |
Inspect the fuel tank vapor vent hose between the EVAP. canister
and air filter
|
| 3) |
Check the EVAP. canister
|
|
| •
|
Malfunctioning gas station filling nozzle (If this problem occurs
at a specific gas station during refueling)
|
|
Other information:
Replacement
1.
Remove the roof trim.
2.
Remove the movable glass.
(Panorama sunroof - refer "Movable Glass")
3.
Remove the roller blind...
Removal
Handling wireless charging system parts by wet hands may cause electric
shock.
1.
Disconnect the negative (-) battery terminal...
Categories
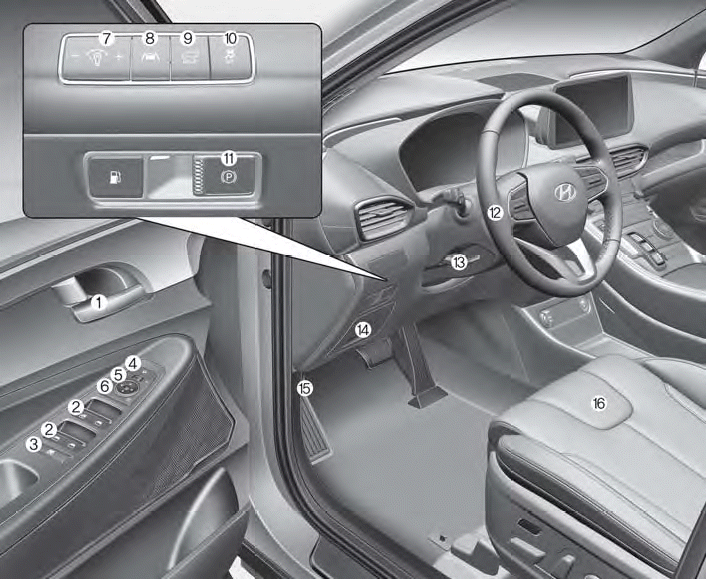
1. Inside door handle
2. Power window switches
3. Power window lock button/Electronic child safety lock button
4. Side view mirror folding button
5. Side view mirror control switch
6. Central door lock switch
7. Instrument panel illumination control switch
read more


