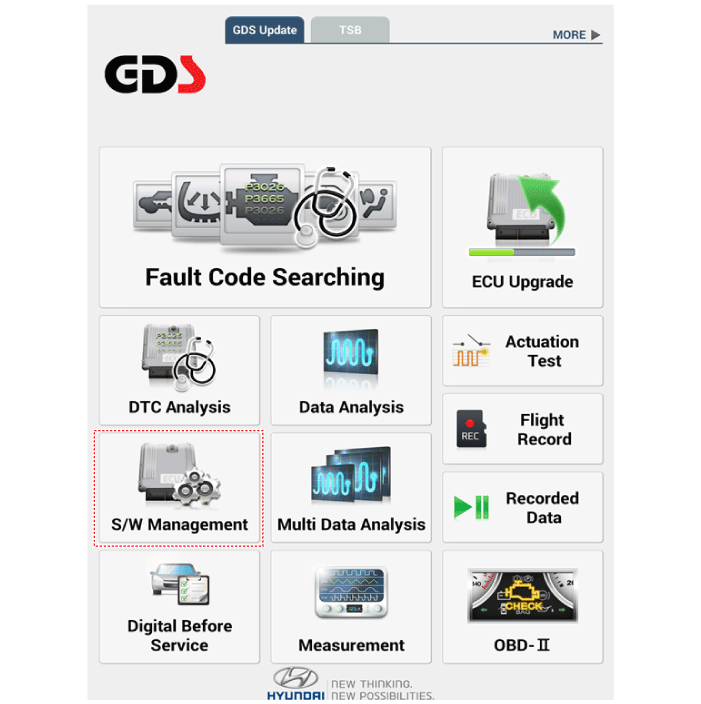
Hyundai Santa Fe: Front View Camera System / Repair procedures
|
When you need variant coding:
| –
|
Replace Front View Camera with a new one
|
※ EOL Variant Coding and calibration required for new replacement
|
Front View Camera Variant Coding
Front view camera variant coding makes it possible to operate functions for
each vehicle type. If the variant coding differs from the vehicle specification,
the "variant coding error" DTC is displayed.
|
1. |
Procedure for coding variants
|
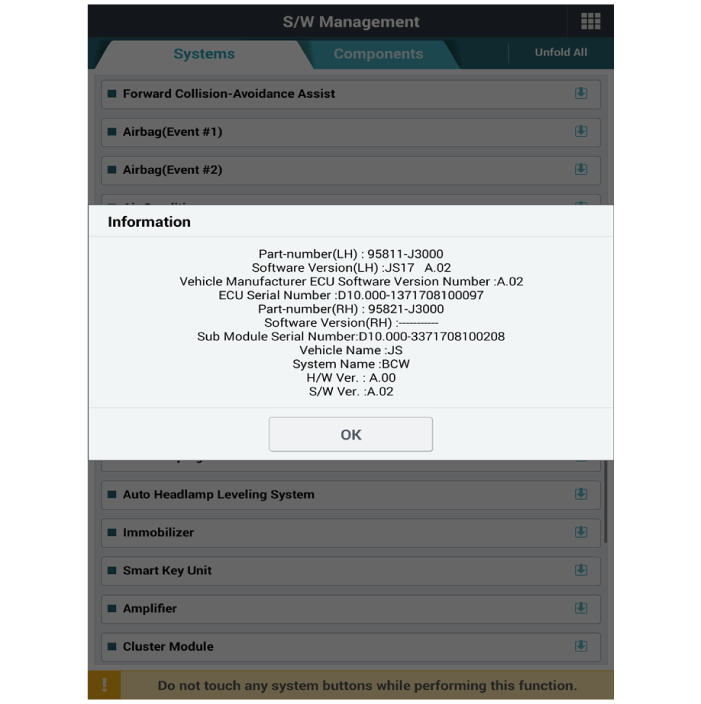
(1) |
You should read the specification information for the front
view camera that is installed in the vehicle before replacing
it with a new front view camera.
|
|
(2) |
Connect the cable of Diagnostic tool to the data link connector
in driver side crash pad lower panel, and turn on the Diagnostic
tool.
|
|
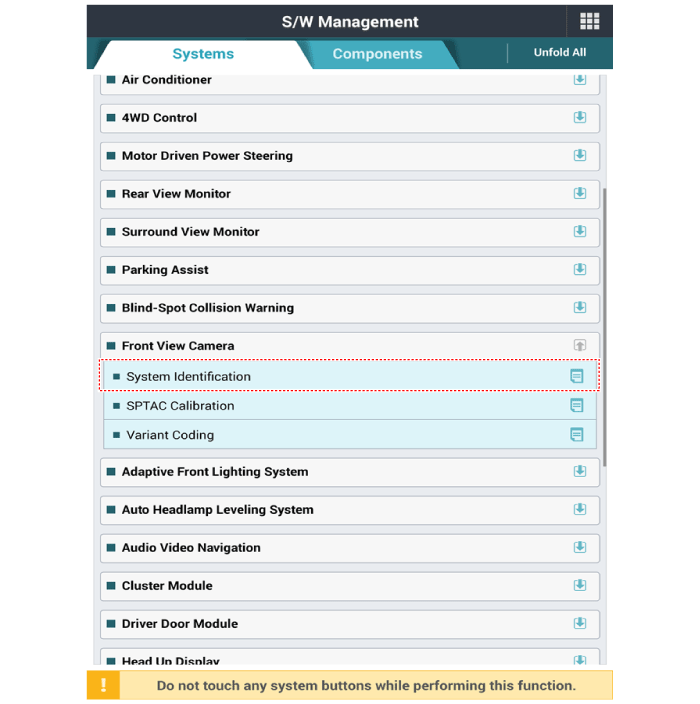
(3) |
Select the 'S/W Management' and 'Car model'.
|
|
(4) |
Select "System Identification".
|
|
(5) |
Select "Variant Coding".

|
|
(6) |
Enter the value of the specification read in procedure(4) in
the new front view camera.
|
|
| Service Point Target Auto
Calibration (SPTAC) |
When you need calibration:
| – |
Front view camera is removed and mounted
|
| – |
Replace front view camera with a new one
|
| – |
Windshield glass changed
|
| – |
front view camera coupler of the windshield glass is deformed
|
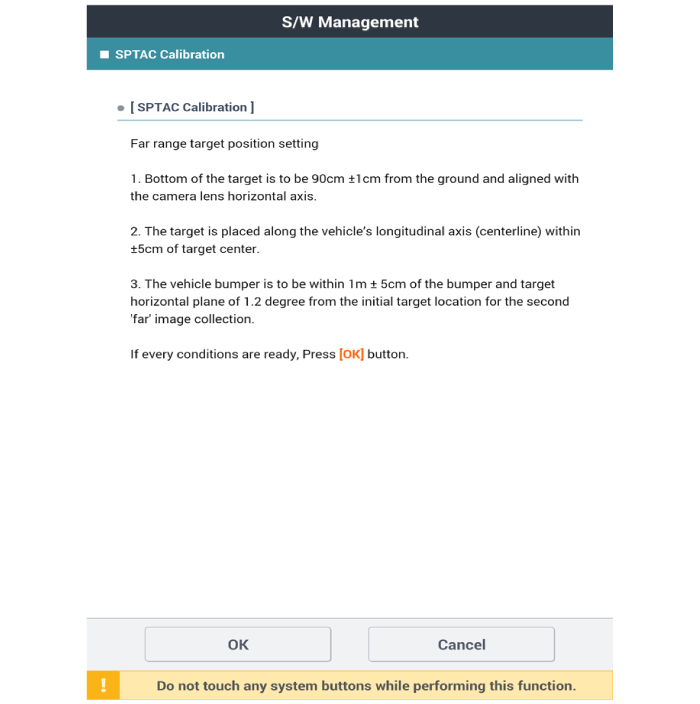
Service Point Target Auto Calibration (SPTAC)
Front view camera SPTAC provides the method for the service technician to calibrate
the camera by aligning the calibration target (SST: 09890-3V100) with the vehicle
on a level ground.
If the calibration is not completed within the specified tolerance front view
camera "System Out of Calibration" DTC is indicated.
|
1. |
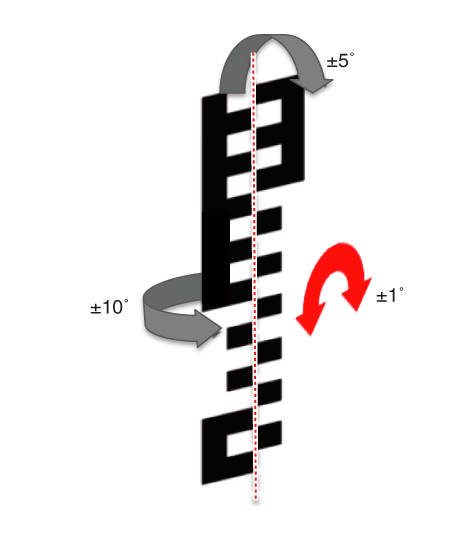
Method for Correct Alignment of Calibration Target
In order to complete the calibration of the front view camera successfully,
install the calibration target as follows:
| –
|
Install the target (SST: 09890-3V100) vertical to the ground
and from the camera referring to the below tolerance angle.
|
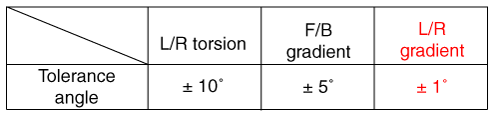
|
The tolerance ± 1° for the left and right gradient is very important
and is sensitive to the flatness of the ground.
Install the compensator vertically using the Level Laser (SST:
09958-3T060 or 09964-C1200).
Arrange the Level Laser (A) on the center of the vehicle by
installing it on the roof center above the vehicle's front windshield
(same for both short and long distance calibrations) .
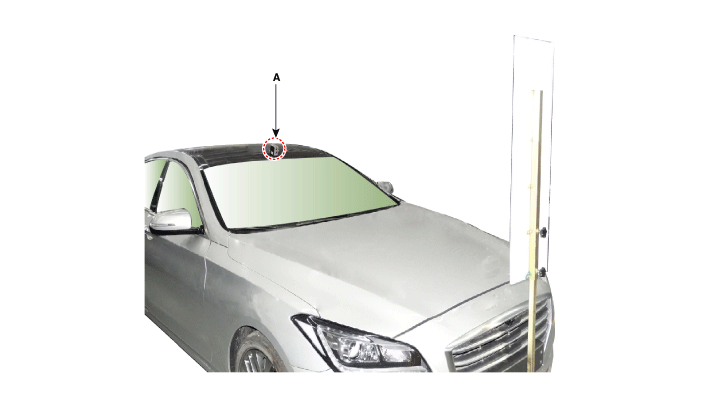
Have the laser illuminate starting from the roof center and
to all the way to the center of the target, passing through
the emblem center.
The level laser must be set to 'ON' and the holding (locking)
function is not used.
|
|
Target is mounted to rigid backer material to maintain flatness
requirements.
|
– |
Target has reflective (not faded or poorly painted)
markings that are unlike from lane features.
|
|
– |
Target is 30 cm wide and 100 cm tall.
|
|
– |
Mounting area must NOT have cross hatch patterns or
textual markings near the target.
|
|
– |
Target should be well lit for optimal performance using
non-fluctuating illumination. There shall be no continuous
shadows cast on the target.
|
|
– |
The light should be directed toward the target front
and the target front should be brighter than the target
rear and target.
|
|
|
|
2. |
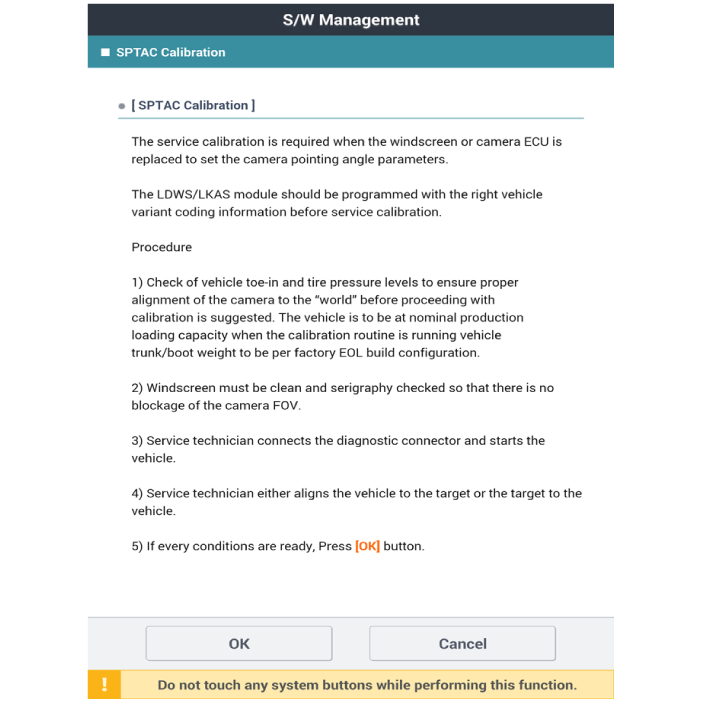
Service Point Target Auto Calibration(SPTAC) Procedure
| 1) |
It is recommended to check vehicle toe-in and tire pressure
levels to ensure proper alignment of the camera to the "world"
before proceeding with calibration. The vehicle to run the calibration
routine is to be at nominal production loading capacity.
|
| 2) |
Windshield must be clean and silk-screen checked so that there
is no blockage of the camera.
|
| 3) |
Service technician connects the diagnostic connector and starts
the vehicle. The front view camera should not be activated by
pressing the switch.
|
| 4) |
The service calibration routine may not run correctly if any
system level fault is active.
|
| 5) |
If working with a replacement ECU: the service technician initiates
the SPTAC Reset configuration.
|
| 6) |
Service technician either aligns the vehicle to the target or
the target to the vehicle.
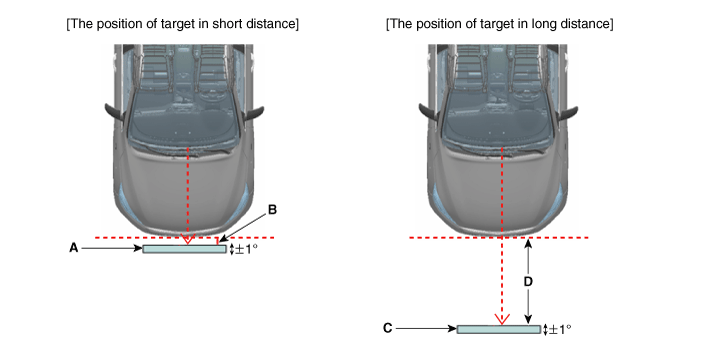
a. Locate the bottom of the target 90cm from the ground (max.
tolerance: 1cm).
b. Locate so that the central axis of the target and the central
axis of the vehicle match (max. tolerance: 3cm).
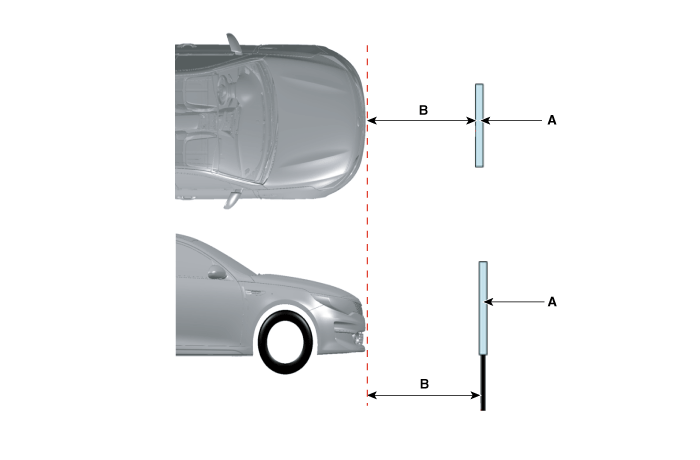
c. Locate the short-distance target (A) so that it adheres by
0cm (B) to the bumper front (max. tolerance: 5cm).
d. The location of the long-distance target (C) is 100cm (D)
before the bumper (max. tolerance: 5cm).
|
| 7) |
Select Camera Calibration under Option of Global Diagnosis System
(Diagnostic tool).

|
| 8) |
The technician should complete the short-distance calibration
after checking the target location and "OK" message on the Diagnostic
tool.
|
| 9) |
The technician should complete the long-distance calibration
after checking the target location and "OK" message on the Diagnostic
tool (conduct the calibration twice: short and long distances).
|
If the distance 100 ± 5 cm (39.4 ± 2 inch) is different
from the distance indicated on the Diagnostic tool,
calibrate it according to the value indicated on the
Diagnostic tool.
|
|
|
Test Drive
| –
|
Be sure to perform test drive to check for normal operation
after performing calibration.
|
| –
|
Drive on straight road (of longer than 500 m) with 2 white or
yellow lane marks at speed of over 40mph(60km/h), and check
for the alert as you intentionally steer close to the lane mark.
|
| –
|
LKA operates properly if the lane mark segment space is less
than 8 m.
|
| –
|
Perform test drive on car-only road or on a highway.
|
|
| •
|
The LKA is a system to prevent lane departure and assist steering.
In any case, do not rely on the steering assist system, and
the driver must take the necessary precautions to determine
safety matters.
|
| –
|
Driver is responsible for being aware of surroundings and steering
the vehicle for safe driving practices.
|
| –
|
Do not tinted window or attaching any types of coatings and
accessories.
|
| –
|
Do not allow any water or liquid to contact the front view camera.
|
| –
|
Do not remove the front view camera parts and do not damage
the front view camera by a strong impact.
|
| –
|
Do not put objects that reflect light on the crash pad.
|
| –
|
Excessive noise can make the LKA alarm sound unheard.
|
|
High Beam Asisst (HBA)
|
The system may not operate normally in the below conditions.
| –
|
When the light from the oncoming or front vehicle is not detected
because of lamp damage, hidden from sight, etc.
|
| –
|
When the lamp of the oncoming or front vehicle is covered with
dust, snow or water.
|
| –
|
When the light from the oncoming or front vehicle is not detected
because of exhaust fume, smoke, fog, snow, etc.
|
| –
|
When the front window is covered with foreign matters such as
ice, dust, fog, or is damaged.
|
| –
|
When there is a similar shape lamp with the front vehicle’s
lamps.
|
| –
|
When it is hard to see because of fog, heavy rain or snow.
|
| –
|
When the headlamp is not repaired or replaced at an authorized
dealer.
|
| –
|
When headlamp aiming is not properly adjusted.
|
| –
|
When driving on a narrow curved road or rough road.
|
| –
|
When driving downhill or uphill.
|
| –
|
When only part of the vehicle in front is visible on a crossroad
or curved road.
|
| –
|
When there is a traffic light, reflecting sign, flashing sign
or mirror.
|
| –
|
When the road conditions are bad such as being wet or covered
with snow.
|
| –
|
When the front vehicle’s headlamps are off but the fog lamps
on.
|
| –
|
When a vehicle suddenly appears from a curve.
|
| –
|
When the vehicle is tilted from a flat tire or being towed.
|
|
Forward Collision-avoidance Assist (FCA) / Highway Driver Assist
|
The Forward Collision-avoidance Assist (FCA) and the Highway Driver
Assist may not operate properly in the following conditions, when
| –
|
The sight of the objects in front is narrow (etc. motorcycle).
|
| –
|
The car in front takes a round turn at the roundabout.
|
| –
|
The car in front is a special-featured vehicle such as a special
vehicle or a truck carrying a specific type of luggage or a
trailer.
|
| –
|
The rear part of the car in front is not properly identified.
(ex it is turned or overturned).
|
|
Lane Keeping Assist (LKA) / Lane Keeping Assist (LFA) / Highway Driver Assist
|
The FCA/HDA may not activate properly in the following conditions.
The LKA may not activate properly when :
| –
|
It is difficult to distinguish the lane from the road due to
dust built up on the lane.
|
| –
|
It is difficult to distinguish the color of the lane line from
the road.
|
| –
|
There is a mark that looks like a lane line near the line.
|
| –
|
The lane line is indistinct or damaged.
|
| –
|
The number of lanes increases or decreases or the lane lines
are crossing (driving through toll plaza, toll gate, road merging
or dividing area, etc.).
|
| –
|
There are more than two lane lines.
|
| –
|
The lane is very wide or narrow.
|
| –
|
The lane is not visible due to snow, rain, stain, a puddle or
other factors.
|
| –
|
Shadows of objects (median strip, guard rail, noise barriers,
etc.) surrounding the road are casted on the lane.
|
| –
|
The lane is congested or it is replaced by a structure in a
construction area.
|
| –
|
There is a indication on the road surface such as crosswalk
or road signs.
|
| –
|
The lane inside the tunnel is covered with dust or oil.
|
| –
|
There is a boundary structure.
|
| –
|
Driving on the bus-only lane or on the left/right of the lane.
|
| –
|
The lane suddenly disappears at certain locations such as at
the intersection.
|
|
Other information:
Fan speed control
The fan speed can be set as desired by pushing the fan speed control button.
More air is delivered with higher fan speeds.
Pressing the OFF button turns off the fan.
NOTICE
Operating the fan when the ignition switch is in the ON position could cause
the battery to discharge...
Replacement
•
Put on gloves to prevent hand injuries.
•
When removing with a flat-tip screwdriver or remover, wrap protective
tape around the tools to prevent damage to components...
Categories
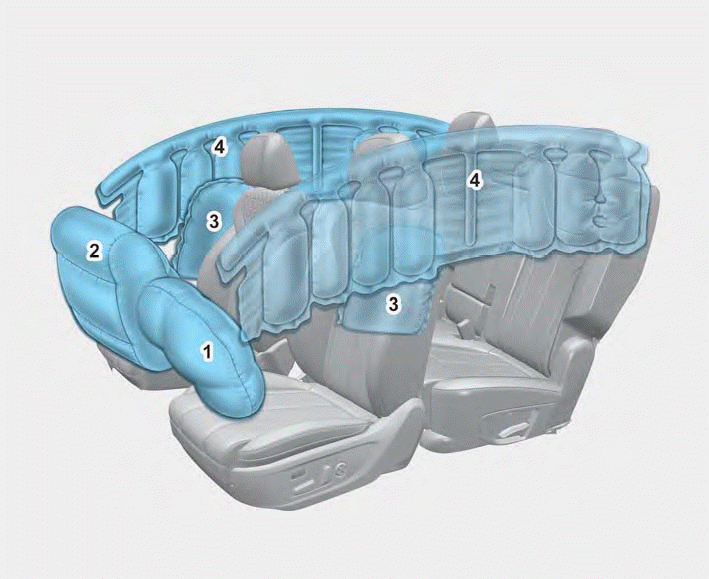
1. Driver’s front air bag
2. Passenger’s front air bag
3. Side air bag
4. Curtain air bag
The vehicles are equipped with a Supplemental Air Bag System for the driver’s
seat and front passenger’s seats.
The front air bags are designed to supplement the three-point seat belts. For
these air bags to provide protection, the seat belts must be worn at all times when
driving.
read more


