Hyundai Santa Fe (TM): Panorama Sunroof / Panorama Sunroof Motor. Repair procedures
Hyundai Santa Fe (TM) 2019-2023 Service and Repair Manual / Body Electrical System / Panorama Sunroof / Panorama Sunroof Motor. Repair procedures
| Replacement |
| 1. |
Disconnect the negative (-) battery terminal.
|
| 2. |
Remove the roof trim assembly.
(Refer to Body - "Roof Trim Assembly")
|
| 3. |
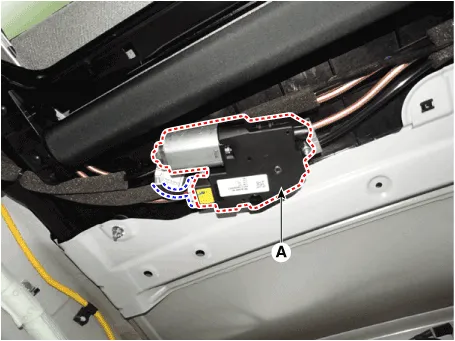
Remove the panoramaroof motor mounting screws (3EA). And then remove
the panoramaroof motor (A) after disconnecting the connector.
[Glass Motor]
|
| 4. |
Remove the panoramaroof motor mounting screws (3EA). And then remove
the panoramaroof motor (A) after disconnecting the connector.
[Blind Motor]
|

Resetting The Panoramaroof
Whenever the vehicle battery is disconnected or discharged, or you use the emergency
handle to operate the panoramaroof, you have to reset your panoramaroof system
as follows :
You need to reset the sunroof motor to its default settings for the
following cases :
|

| 1. |
Turn the ignition key to the ON position and then close the panoramaroof
completely.
|
| 2. |
Release the panoramaroof control lever.
|
| 3. |
Press and hold the CLOSE button for more than 10 seconds until the sunroof
has moved slightly.
|
| 4. |
Release the panoramaroof control lever.
|
| 5. |
Press and hold the CLOSE button once again within 5 seconds until the
panorama sunroof do as follows ;
|
| 6. |
Reset procedure of panorama system is finished.
|
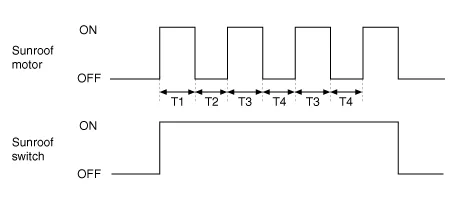
Protecting The Overheated Motor
In order to protect the overheated panoramaroof motor by continuous motor operation,
the panoramaroof ECU controls the Run-time and Cool-time of motor as followings;
| 1. |
The panoramaroof ECU detects the Run- time of motor
|
| 2. |
Motor can be operated continuously for the 1st Run-time(120 ± 10sec.).
|
| 3. |
Motor which is operated continuously stops operating after the 1st Run-time(120
± 10sec.).
|
| 4. |
And then Motor is not operated for the 1st Cool-time(18 ± 2sec.).
|
| 5. |
Motor is operated for the 2nd Run-time(10 ± 2sec.) at the continued
motor operation after 1st Cool-time(18 ± 2sec.)
|
| 6. |
Motor which is operated continuously stops operating after the 2nd Run-time(10
± 2sec.)
|
| 7. |
Motor is not operated for the 2nd Cool-time(18 ± 2sec.).
|
| 8. |
Motor repeats the 2nd Run-time and 2nd Cool-time at the continued motor
operation.
T1 : 120 ± 10 sec., T2 : 18 ± 2 sec.,
T3 : 10 ± 2 sec., T4 : 18 ± 2 sec.
|
Inspection 1. Disconnect the negative (-) battery terminal. 2. Open the sunglass case cover from the overhead console then remove screws (2EA).
Other information:
Hyundai Santa Fe (TM) 2019-2023 Service and Repair Manual: Power Mosfet (DATC). Repair procedures
Inspection 1. Turn the ignition switch ON. 2. Manually operate the control switch and measure the voltage of the blower motor. 3. Select the control switch to raise the voltage until high speed.
Hyundai Santa Fe (TM) 2019-2023 Service and Repair Manual: Components and components location
Categories
- Manuals Home
- Hyundai Santa Fe Owners Manual
- Hyundai Santa Fe Service Manual
- Driving your vehicle
- Convenience features
- Instrument cluster
- New on site
- Most important about car

Copyright © 2025 www.hsafe4.com - 0.0129