Hyundai Santa Fe: SRSCM / Side Impact Sensor (SIS). Repair procedures
Hyundai Santa Fe (TM) 2019-2025 Service Manual / Restraint / SRSCM / Side Impact Sensor (SIS). Repair procedures
| Removal |
|

Pressure Side Impact Sensor [P-SIS(Door)]
| 1. |
Disconnect the battery negative cable, and wait for at least three minutes
before beginning work.
|
| 2. |
Remove the front door trim.
(Refer to Body - "Front Door Trim")
|
| 3. |
Disconnect the front side impact sensor connector (A).
|
| 4. |
Remove the front side impact sensor (A) by loosening the screw.
|
Gravity Side Impact Sensor [G-SIS(B Pillar)]
| 1. |
Disconnect the negative battery terminal, and wait for at least thirty
seconds before beginning to work.
|
| 2. |
Remove the center pillar trim.
(Refer to Body - "Center Pillar Trim")
|
| 3. |
Disconnect the connector (B) and then remove the side impact sensor
(A) after loosening the mounting bolt.
|
Gravity Side Impact Sensor [G-SIS(C-Pillar)]
| 1. |
Disconnect the battery negative cable and wait for at least three minutes
before beginning work.
|
| 2. |
Remove the luggage side trim.
(Refer to Body - "Luggage Side Trim")
|
| 3. |
Disconnect the connector (B) and then remove the side impact sensor
(A) after loosening the mounting bolt.
|
| Installation |
|
Pressure Side Impact Sensor [P-SIS (Door)]
| 1. |
Install the new front side impact sensor with the screws, then connect
the front side impact sensor connector.
|
| 2. |
Install the front door trim.
(Refer to Body - "Front Door Trim")
|
| 3. |
Reconnect the battery negative cable.
|
| 4. |
After installing the front side impact sensor, confirm proper system
operation:
Turn the ignition switch ON; the SRS indicator light should turn on
for about six seconds and then go off.
|
Gravity Side Impact Sensor [G-SIS (C-Pillar)]
| 1. |
Install the new rear side impact sensor with a bolt and then connect
the rear side impact sensor connector.
|
| 2. |
Install the luggage side trim.
(Refer to Body - "Luggage Side Trim")
|
| 3. |
Reconnect the battery negative cable.
|
| 4. |
After installing the rear side impact sensor, confirm proper system
operation:
Turn the ignition switch ON; the SRS indicator light should turn on
for about six seconds and then go off.
|
Gravity Side Impact Sensor [G-SIS(B-Pillar)]
|
| 1. |
Install the side impact sensor with the bolt then connect the side impact
sensor connector.
|
| 2. |
Install the luggage side trim.
(Refer to Body - "Luggage Side Trim")
|
| 3. |
Reconnect the battery negative cable.
|
| 4. |
After installing the pressure side impact sensor, confirm proper system
operation:
|
|
 Side Impact Sensor (SIS). Components and components location
Components
1. Gravity Side
Impact Sensor [G-SIS(B-Pillar)]
2. Gravity Side Impact Sensor [G-SIS(C-Pillar)]
3...
 Seat Belt Buckle Switch (BS). Description and operation
Description
The SRSCM monitors the status of the driver and front passenger seat belt buckle.
The SRSCM provides one pin each for the driver and front passenger seat belt
buckle status input...
Categories
- Manuals Home
- 4th Generation Santa Fe Owners Manual
- 4th Generation Santa Fe Service Manual
- Smart liftgate
- Gauges and meters
- Seat cushion extension adjustment (for driver's seat)
- New on site
- Most important about car
Instrument panel overview
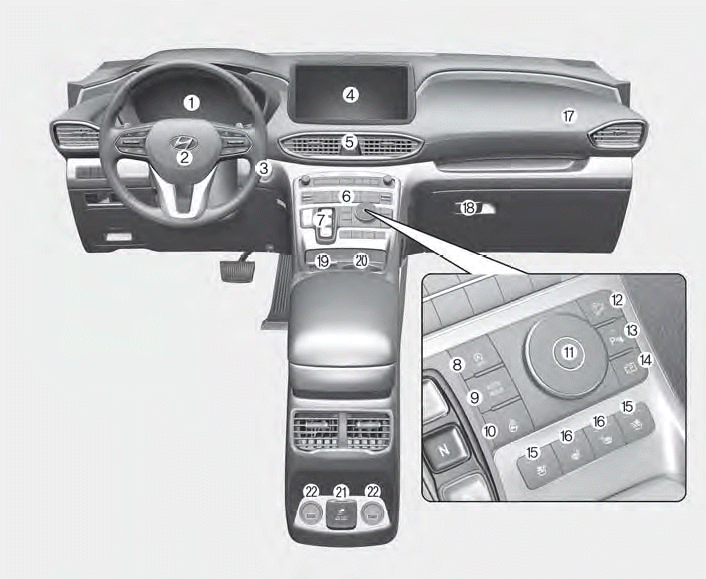
1. Instrument cluster
2. Driver’s front air bag
3. Engine Start/Stop button
4. Infotainment system
5. Hazard warning lamp switch
6. Climate control system
7. Shift button
8. ISG (Idle Stop and Go) button
9. Auto Hold button
10. Heated steering wheel button
11. Drive mode button
12. DBC (Downhill Brake Control) button
13. Parking Safety button
14. Parking/View button
15. Air ventilation seat button
16. Seat warmer
17. Passenger’s front air bag
18. Glove box
19. Wireless charging system pad
20. Cup holder
21. AC inverter
22. USB charger

Copyright © 2025 www.hsafe4.com