Hyundai Santa Fe: Crash Pad / Cowl Cross Bar Assembly. Repair procedures
Hyundai Santa Fe (TM) 2019-2025 Service Manual / Body (Interior and Exterior) / Crash Pad / Cowl Cross Bar Assembly. Repair procedures
| Replacement |
|

|

| 1. |
Disconnect the negative (-) battery terminal.
|
| 2. |
Recover the refrigerant with a recovery/recycling/charging station.
|
| 3. |
When the engine is cool, drain the engine coolant from the radiator.
(Refer to Engine Mechanical System - “Coolant”)
|
| 4. |
Remove the cowl top cover.
(Refer to "Cowl Top Cover")
|
| 5. |
Disconnect the inlet and outlet heater hoses from the heater unit.
(Refer to Heating,Ventilation And Air Conditioning - "Heater Unit")
|
| 6. |
Remove both sides of front seat assembly.
(Refer to Front Seat - "Front Seat Assembly")
|
| 7. |
Remove the main crash pad assembly.
(Refer to Crash Pad - "Main Crash Pad Assembly")
|
| 8. |
Disconnect the steering column connectors.
(Refer to Steering System - "Steering Column and Shaft")
|
| 9. |
Loosen the mounting nuts and through bolts in the frontal area and lower
the steering column.
(Refer to Steering System - "Steering Column and Shaft")
|
| 10. |
Loosen the engine room cowl cross bar assembly mounting bolts.
|
| 11. |
Loosen the mounting nuts and remove the floor air duct (A).
|
| 12. |
Loosen the mounting bolt and nut, remove the accelerator pedal module
(A).
|
| 13. |
Press the lock pin, separate the accelator pedal connector (A).
|
| 14. |
Remove the rear air duct (A) and then separate the floor carpet (B)
backwards.
|
| 15. |
Loosen the mounting nuts and remove the rear heating duct (A).
|
| 16. |
Press the lock pin and separate the airbag control module(SRSCM) connector
(A).
|
| 17. |
Disconnect the connector (A) and the mounting wiring fasteners in the
front pillar.
[Driver's]
[Passenger's]
|
| 18. |
Disconnect the passenger compartment junction box connectors (A).
|
| 19. |
Disconnect the multi box connectors (A).
[Driver's]
[Passenger's]
|

| 20. |
Disconnect the heater and blower unit connector.
|
| 21. |
Loosen the heater & blower unit front mounting bolt (A).
|
| 22. |
Loosening the cowl cross bar side mounting bolt (B) after loosening
the plug hole (A).
|
| 23. |
Loosen the mounting bolts and remove the cowl croos bar assembly (A).
|
| 24. |
To install, reverse removal procedure.
|

 Roof Trim
..
Other information:
Hyundai Santa Fe (TM) 2019-2025 Service Manual: Repair procedures
Replacement • Put on gloves to prevent hand injuries. • When removing with a flat-tip screwdriver or remover, wrap protective tape around the tools to prevent damage to components...
Hyundai Santa Fe (TM) 2019-2025 Owner's Manual: Sunroof inside air recirculation. Auto. Controls That Use Climate Control Settings (for driver’s seat)
Sunroof inside air recirculation When the is sunroof opened, fresh mode will be automatically selected. At this time, if you press the air intake control button, recirculation mode will be selected but will change back to fresh mode after 3 minutes...
Categories
- Manuals Home
- 4th Generation Santa Fe Owners Manual
- 4th Generation Santa Fe Service Manual
- Resetting the power liftgate
- Gauges and meters
- Engine Control System
- New on site
- Most important about car
Interior Overview
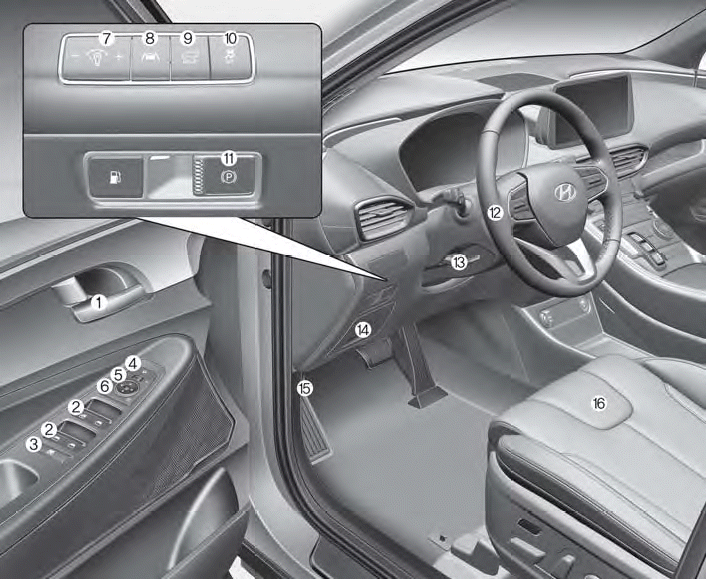
1. Inside door handle
2. Power window switches
3. Power window lock button/Electronic child safety lock button
4. Side view mirror folding button
5. Side view mirror control switch
6. Central door lock switch
7. Instrument panel illumination control switch

Copyright © 2025 www.hsafe4.com