Hyundai Santa Fe (TM): Rear Seat / Rear Seat Frame Assembly. Repair procedures
[Second row seat assembly]
(LH)
| •
|
Put on gloves to protect your hands.
|
|
| •
|
When prying with a flat-tip screwdriver, wrap it with protective
tape, and apply protective tape around the related parts, to
prevent damage.
|
| •
|
Use a plastic panel removal tool to remove interior trim pieces
to protect from marring the surface.
|
| •
|
Take care not to bend or scratch the trim and panels.
|
|
|
1. |
Remove the rear seat back cover.
(Refer to Rear Seat - "Rear Seat Back Cover")
|
|
2. |
Remove the rear seat cushion cover.
(Refer to Rear Seat - "Rear Seat Cushion Cover")
|
|
3. |
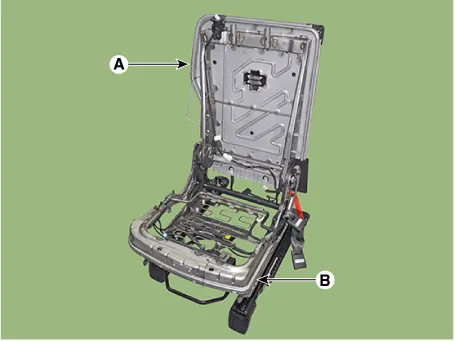
After loosening the mounting bolts, then remove the rear seat back frame
assembly (A) and rear seat cushion frame assembly (B).
|
Tightening torque :
44.1 - 53.9 N.m (4.5 - 5.5 kgf.m, 32.5 - 39.8 lb-ft)
|

|
|
4. |
Install in the reverse order of removal.
|
• |
Replace any damaged clips.
|
|
|
(RH)
| •
|
Put on gloves to protect your hands.
|
|
| •
|
When prying with a flat-tip screwdriver, wrap it with protective
tape, and apply protective tape around the related parts, to
prevent damage.
|
| •
|
Use a plastic panel removal tool to remove interior trim pieces
to protect from marring the surface.
|
| •
|
Take care not to bend or scratch the trim and panels.
|
|
|
1. |
Remove the rear seat back cover.
(Refer to Rear Seat - "Rear Seat Back Cover")
|
|
2. |
Remove the rear seat cushion cover.
(Refer to Rear Seat - "Rear Seat Cushion Cover")
|
|
3. |
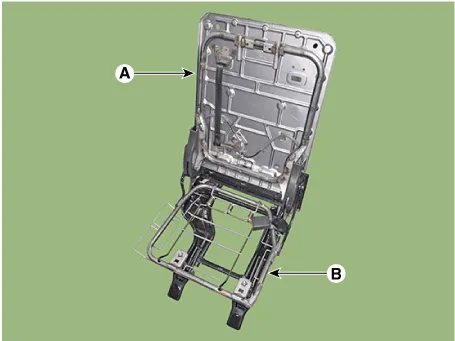
After loosening the mounting bolts, then remove the rear seat back frame
assembly (A) and rear seat cushion frame assembly (B).
|
Tightening torque :
44.1 - 53.9 N.m (4.5 - 5.5 kgf.m, 32.5 - 39.8 lb-ft)
|

|
|
4. |
Install in the reverse order of removal.
|
• |
Replace any damaged clips.
|
|
|
[Third row seat assembly]
| •
|
Put on gloves to protect your hands.
|
|
| •
|
When prying with a flat-tip screwdriver, wrap it with protective
tape, and apply protective tape around the related parts, to
prevent damage.
|
| •
|
Use a plastic panel removal tool to remove interior trim pieces
to protect from marring the surface.
|
| •
|
Take care not to bend or scratch the trim and panels.
|
|
|
1. |
Remove the rear seat back cover.
(Refer to Rear Seat - "Rear Seat Back Cover")
|
|
2. |
Remove the rear seat cushion cover.
(Refer to Rear Seat - "Rear Seat Cushion Cover")
|
|
3. |
After loosening the mounting bolts, then remove the rear seat back frame
assembly (A) and rear seat cushion frame assembly (B).
|
Tightening torque :
44.1 - 53.9 N.m (4.5 - 5.5 kgf.m, 32.5 - 39.8 lb-ft)
|

|
|
4. |
Install in the reverse order of removal.
|
• |
Replace any damaged clips.
|
|
|
Component Location
[Second row seat assembly]
(LH)
1. Rear seat
back frame assembly
2. Rear seat
cushion frame assembly
(RH)
1.
Other information:
Inspection
1.
Connect the battery voltage and check the blower motor rotation.
2.
If the blower motor does not operate well, substitute with a known-good
blower motor and check for proper operation.
Replacement
•
When removing with a flat-tip screwdriver or remover, wrap protective
tape around the tools to prevent damage to components.


