Hyundai Santa Fe (TM): Convenience features / Mirrors
Inside rearview mirror
Before driving your vehicle, check to see that your inside rearview mirror is properly positioned. Adjust the rearview mirror so that the view through the rear window is properly centered.
WARNING
Make sure your line of sight is not obstructed. Do not place objects in the rear seat, cargo area, or behind the rear headrests which could interfere with your vision through the rear window.
WARNING
To prevent serious injury during an accident or deployment of the air bag, do not modify the rearview mirror and do not install a wide mirror.
WARNING
NEVER adjust the mirror while driving. This may cause loss of vehicle control resulting in an accident.
NOTICE
When cleaning the mirror, use a paper towel or similar material dampened with glass cleaner. Do not spray glass cleaner directly on the mirror as this may cause the liquid cleaner to enter the mirror housing.
Electric Chromic Mirror (ECM)
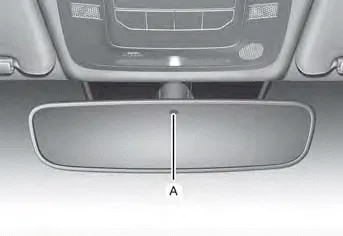
[A] : Indicator
Some vehicles come equipped with an electrochromic mirror that helps control glare while driving at night or under low light driving conditions.
When the engine is running, the glare is automatically controlled by the sensor mounted in the rearview mirror. The sensor detects the light level around the vehicle, and automatically adjusts to control the headlight glare from vehicles behind you.
Whenever the the gear is shifted to R (Reverse), the mirror will automatically go to the brightest setting in order to improve the driverŌĆÖs view behind the vehicle.
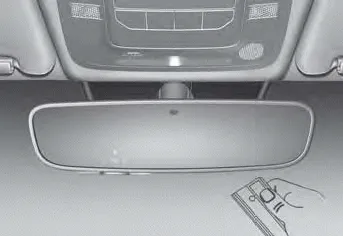
Day/night rearview mirror

[A]: Day, [B]: Night
Make this adjustment before you start driving and while the day/night lever is in the day position.
Pull the day/night lever towards you to reduce glare from the headlights of the vehicles behind you during night driving.
Remember that you lose some rearview clarity in the night position.
Electrochromic mirror (ECM) with HomeLink® system
Your vehicle may be equipped with a Gentex Automatic-Dimming Mirror with an Integrated HomeLink® Wireless Control System.
During nighttime driving, this feature will automatically detect and reduce rearview mirror glare. The HomeLink® Universal Transceiver allows you to activate your garage door(s), electric gate, home lighting, etc.
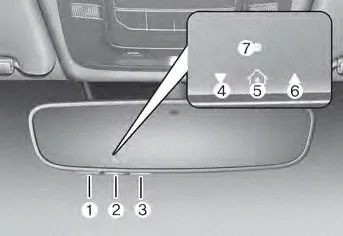
(1) HomeLink Channel 1
(2) HomeLink Channel 2
(3) HomeLink Channel 3
(4) Garage Door Opener Status Indicator: Closing or Closed
(5) HomeLink Operation Indicator
(6) Garage Door Opener Status Indicator: Opening or Opened
(7) HomeLink User Interface Indicator
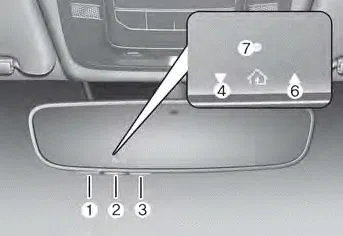
Automatic-Dimming Night Vision SafetyŌäó (NVS┬«) Mirror
The NVS® Mirror automatically reduces glare by monitoring light levels in the front and the rear of the vehicle. Any object that obstructs either light sensor will degrade the automatic dimming control feature.
Your mirror will automatically dim upon detecting glare from the vehicles traveling behind you.
The mirror defaults to the ON position each time the vehicle is started.
Integrated HomeLink® Wireless Control System
The HomeLink® Wireless Control System provides a convenient way to replace up to three hand held radio-frequency transmitters used to activate compatible devices such as gate operators, garage door openers, entry door locks, security systems, and home lighting.
NOTICE
HomeLink® operates while the ignition switch is in the ACC or ON position for safety reasons. It is to prevent unintentional security problems from happening when the vehicle is parked outside the garage.
WARNING
Before programming HomeLink® to a garage door opener or gate operator, make sure people and objects are out of the way of the device to prevent potential harm or damage. Do not use the HomeLink® with any garage door opener that lacks the safety stop and reverse features required by U.S. federal safety standards (this includes any garage door opener model manufactured before April 1, 1982). A garage door that cannot detect an object - signaling the door to stop and reverse - does not meet current U.S. federal safety standards. Using a garage door opener without these features increases the risk of serious injury or death.
For more information, contact HomeLink® at www.homelink.com, or call Home-Link customer support at 1-800-355-3515.
It is also recommended that a new battery be replaced in the handheld transmitter of the device being trained to HomeLink® for quicker training and accurate transmission of the radio frequency.
1. Programming HomeLink®
The following steps show how to program HomeLink. If you have any questions or are having difficulty programming your HomeLink buttons, refer to the HomeLink website or call the HomeLink customer support toll-free number. Do this before going back to the dealer who sold you the car.
- Visit the HomeLink website at: www. homelink.com. Then at the top of the page, choose your vehicle make. Then watch the You Tube video, and/or access additional website information.
- If you choose to access the website via your cell phone, scan the QR
code.

- Or call HomeLink customer support at 1-800-355-3515 (Please have the vehicle make/model and the opener device make/model readily available.)
1) Programming Preparation
1. When programming a garage door opener, it is advised to park the vehicle outside of the garage.
2. It is recommended that a new battery be placed in the handheld transmitter of the device being programmed to HomeLink for quicker training and accurate transmission of the radiofrequency signal.
3. Place the ignition switch to the ACC (Accessory) position for programming of HomeLink.
2) Programming a New HomeLink®
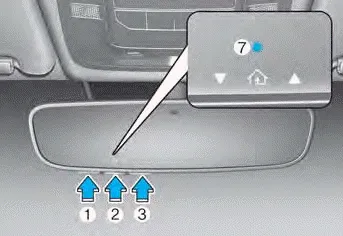
1. Press and release the HomeLink button (1), (2) or (3), you would like to program. The HomeLink indicator light (7) will flash orange slowly (if not, perform the steps of ŌĆ£Erasing HomeLink ButtonsŌĆØ section, and start over).
2. Position the garage door opener remote 1 ŌĆō 3 inches (2 ŌĆō 8cm) away from the HoleLink buttons.
3. While the HomeLink indicator light (7) is flashing orange, press and hold the hand-held remote button. Continue pressing the handheld remote button until the HomeLink indicator light (7) light changes from orange to green. You may now release the handheld remote button.
4. Wait until your garage door comes to a complete stop, regardless of position, before proceeding to the next steps.
5. Press and release the HomeLink button you are programming and observe the indicator light.
-
Side View mirrors

Your vehicle is equipped with both lefthand and right-hand side view mirrors. The mirrors can be adjusted remotely with the mirror adjustment control switch. The side view mirrors can be folded to help prevent damage when going through an automatic car wash or when passing through a narrow street.
The right side view mirror is convex. Objects seen in the mirror are closer than they appear.
Use the inside rear view mirror or look back directly to determine the actual distance of other vehicles prior to changing lanes.
Make sure to adjust the side view mirrors to your desired position before you begin driving.
WARNING
Do not adjust or fold the side view mirrors while driving. This may cause loss of vehicle control resulting in an accident.
NOTICE
- Do not scrape ice off the mirror face; this may damage the surface of the glass.
- If the mirror is jammed with ice, do not adjust the mirror by force. Use an approved de-icer (not radiator antifreeze) spray, or a sponge or soft cloth with very warm water, or move the vehicle to a warm place and allow the ice to melt.
- Do not clean the mirror with harsh abrasives, fuel or other petroleum based cleaning products.
Adjusting the side view mirrors
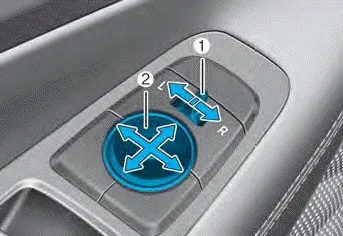
1. Move the lever (1) either to the L (left side) or R (right side) to select the side view mirror you would like to adjust.
2. Use the mirror adjustment control (2) to position the selected mirror up, down, left or right.
3. After adjustment, move the lever (1) to the middle to prevent inadvertent adjustment.
NOTICE
- The mirrors stop moving when they reach the maximum adjusting angles, but the motor continues to operate while the switch is pressed. Do not press the switch longer than necessary, because this can damage the motor.
- Do not attempt to adjust the side view mirrors by hand, because this can damage the motor.
Folding the side view mirror
Manual type
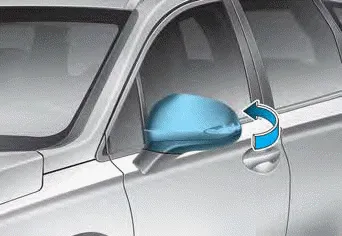
To fold the side view mirror, grasp the housing of the mirror and then fold it toward the rear of the vehicle.
Electric type
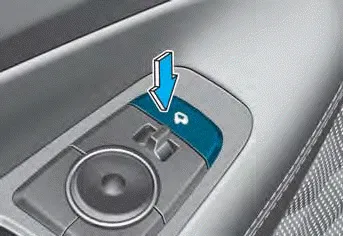
The side view mirror can be folded or unfolded by pressing the switch.
- If 'Convenience -> Welcome mirror/light -> On door unlock' is selected in
the User Settings mode on the LCD display, the outside mirror will fold or unfold
automatically as follows:
- The mirror will fold or unfold when the door is locked or unlocked by the smart key.
- The mirror will fold or unfold when the door is locked or unlocked by the button on the outside door handle. - If 'Convenience -> Welcome mirror/light -> On door unlock' and 'Convenience -> Welcome mirror/light -> On driver approach' is selected in the User Settings mode on the LCD display, the outside mirror will unfold automatically when you approach the vehicle (all doors closed and locked) with a smart key in possession.
NOTICE
The electric type side view mirror operates even though the ignition switch is in the OFF position. However, to prevent unnecessary battery discharge, do not adjust the mirrors longer than necessary while the engine is not running.
NOTICE
Do not fold the electric type side view mirror by hand. It could cause motor failure.
Reverse parking aid
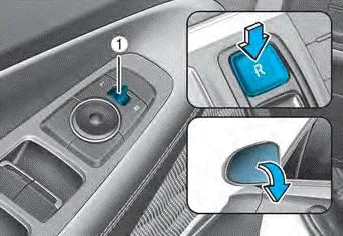
When the gear is shifted to the R (Reverse) position, the side view mirror(s) will rotate downwards to aid with driving in reverse.
The position of the side view mirror switch (1) determines whether or not the mirrors will move:
Left/Right : When either the L (Left) or R (Right) switch is selected, both side view mirrors will move.
Neutral : When neither switch is selected, the outside rearview mirrors will not move.
The side view mirrors will automatically revert to their original positions if any of the following occur:
- The Engine Start/Stop button is pressed to either the OFF position or the ACC position.
- The gear is shifted to any position except R (Reverse).
- The side view mirror adjustment button is not selected.
Electric Power Steering (EPS) The system assists you with steering the vehicle. If the vehicle is turned off or if the power steering system becomes inoperative, you may still steer the vehicle, but it will require increased steering effort.
(1) DriverŌĆÖs door power window switch (2) Front passengerŌĆÖs door power window switch* (3) Rear door (left) power window switch* (4) Rear door (right) power window switch* (5) Window opening and closing (6) Automatic power window* (7) Power window lock switch Power windows The ignition switch must be in the ON position to be able to raise or lower the windows.
Other information:
Hyundai Santa Fe (TM) 2019-2023 Service and Repair Manual: Power Door Mirrors
Components and components location Component Location 1. Power door mirror 2. Power door mirror switch 3. Power folding mirror switch Power Door Mirror Switch. Schematic diagrams Circuit Diagram Power Door Mirror Switch.
Hyundai Santa Fe (TM) 2019-2023 Service and Repair Manual: Surround View Monitor (SVM)
Description and operation Description Surround View Monitor (SVM) is the system that allows video monitoring of 360 degrees around the vehicle. The system includes 4 ultra optical camera mounted around the vehicle (front, both sides, rear).
Categories
- Manuals Home
- Hyundai Santa Fe Owners Manual
- Hyundai Santa Fe Service Manual
- Blower
- Instrument cluster
- Restraint
- New on site
- Most important about car
